迷惑メールを除去してくれるツール、「Rspamd」。
の「CentOS Stream release 8」版です。
ほとんど変わりなく、インストールできます。
前提作業

CentOSバージョン
# cat /etc/centos-release
CentOS Stream release 8
# uname -a
Linux 118-27-30-111 4.18.0-305.3.1.el8.x86_64 #1 SMP Tue Jun 1 16:14:33 UTC 2021 x86_64 x86_64 x86_64 GNU/Linux
redis
Rspamdでは、NoSQLタイプの「redis」を使います。
# dnf install redis
Updating Subscription Management repositories.
Unable to read consumer identity

(略)

Installed:
  redis-5.0.3-2.module_el8.2.0+318+3d7e67ea.x86_64

Complete!
# redis-server --version
Redis server v=5.0.3 sha=00000000:0 malloc=jemalloc-5.1.0 bits=64 build=28849dbea6f07cc8
↑redis version 5.0.3が入りました
# systemctl start redis.service
# systemctl status redis.service

● redis.service - Redis persistent key-value database
   Loaded: loaded (/usr/lib/systemd/system/redis.service; disabled; vendor preset: disabled)
  Drop-In: /etc/systemd/system/redis.service.d
           └─limit.conf
   Active: active (running) since Thu 2021-XX-XX XX:XX:XX JST; 6s ago
 Main PID: 2567 (redis-server)
    Tasks: 4 (limit: 11404)
   Memory: 6.5M
   CGroup: /system.slice/redis.service
           └─2567 /usr/bin/redis-server 127.0.0.1:6379

systemd[1]: Starting Redis persistent key-value database...
systemd[1]: Started Redis persistent key-value database.
↑redisを起動させました
# systemctl enable redis.service
Created symlink /etc/systemd/system/multi-user.target.wants/redis.service → /usr/lib/systemd/system/redis.service.
↑redis 、自動起動を設定
rspamd 本体インストール
# curl https://rspamd.com/rpm-stable/centos-8/rspamd.repo > /etc/yum.repos.d/rspamd.repo
  % Total    % Received % Xferd  Average Speed   Time    Time     Time  Current
                                 Dload  Upload   Total   Spent    Left  Speed
100   167  100   167    0     0     65      0  0:00:02  0:00:02 --:--:--    65
# rpm --import https://rspamd.com/rpm-stable/gpg.key
# yum install rspamd
Updating Subscription Management repositories.
Unable to read consumer identity

This system is not registered with an entitlement server. You can use subscription-manager to register.

(略)

Installed:
  libsodium-1.0.18-2.el8.x86_64                                libunwind-1.3.1-3.el8.x86_64                                rspamd-2.7-42.x86_64

Complete!
rspamd 設定
# rspamadm configwizard
  ____                                     _
 |  _ \  ___  _ __    __ _  _ __ ___    __| |
 | |_) |/ __|| '_ \  / _` || '_ ` _ \  / _` |
 |  _ < \__ \| |_) || (_| || | | | | || (_| |
 |_| \_\|___/| .__/  \__,_||_| |_| |_| \__,_|
             |_|

Welcome to the configuration tool
We use /etc/rspamd/rspamd.conf configuration file, writing results to /etc/rspamd
Modules enabled: metadata_exporter, elastic, mime_types, once_received, milter_headers, spf, phishing, whitelist, dkim_signing, mid, emails, arc, hfilter, settings, asn, force_actions, forged_recipients, bayes_expiry, regexp, fuzzy_check, multimap, chartable, dmarc, rbl, dkim, trie, maillist
Modules disabled (explicitly): http_headers, mx_check, spamtrap, p0f, rspamd_update, dcc
Modules disabled (unconfigured): antivirus, external_services, ip_score, dynamic_conf, spamassassin, maps_stats, reputation, metric_exporter, clustering, clickhouse, fuzzy_collect
Modules disabled (no Redis): neural, url_redirector, history_redis, ratelimit, greylist, replies
Modules disabled (experimental):
Modules disabled (failed):
Do you wish to continue?[Y/n]: 【(Enter)】
Setup WebUI and controller worker:
Controller password is not set, do you want to set one?[Y/n]: 【n】
Redis servers are not set:
The following modules will be enabled if you add Redis servers:
        * neural
        * url_redirector
        * history_redis
        * ratelimit
        * greylist
        * replies
Do you wish to set Redis servers?[Y/n]: 【(Enter)】
Input read only servers separated by `,` [default: localhost]: 【(Enter)】
Input write only servers separated by `,` [default: localhost]: 【(Enter)】
Do you have any password set for your Redis?[y/N]: 【(Enter)】
Do you have any specific database for your Redis?[y/N]: 【(Enter)】
Do you want to setup dkim signing feature?[y/N]: 【(Enter)】
File: /etc/rspamd/local.d/redis.conf, changes list:【(Enter)】
write_servers => localhost
read_servers => localhost

Apply changes?[Y/n]: 【(Enter)】
Create file /etc/rspamd/local.d/redis.conf
1 changes applied, the wizard is finished now
*** Please reload the Rspamd configuration ***
vi /etc/rspamd/local.d/redis.conf
----------------------------------
write_servers = "localhost";
read_servers = "localhost";
 ↓
write_servers = "127.0.0.1:6379";
read_servers = "127.0.0.1:6379";
vi /etc/rspamd/local.d/milter_headers.conf

use = ["spam-header", "x-spam-level", "x-spam-status", "x-virus", "authentication-results"];
skip_local = false;
skip_authenticated = true;
extended_spam_headers = true;
routines {
  spam-header {
    header = "X-Spam-Flag";
    remove = 1;
    value = "YES";
  }
  x-spam-level {
    header = "X-Spam-Level";
    remove = 1;
    char = "*";
  }
  x-spam-status {
    header = "X-Spam-Status";
    remove = 1;
  }
  x-virus {
    header = "X-Virus-Check";
    remove = 1;
    symbols = ["CLAM_VIRUS"];
  }
  authentication-results {
    header = "Authentication-Results";
    remove = 1;
    add_smtp_user = false;
    spf_symbols {
      pass = "R_SPF_ALLOW";
      fail = "R_SPF_FAIL";
      softfail = "R_SPF_SOFTFAIL";
      neutral = "R_SPF_NEUTRAL";
      temperror = "R_SPF_DNSFAIL";
      none = "R_SPF_NA";
      permerror = "R_SPF_PERMFAIL";
    }
    dkim_symbols {
      pass = "R_DKIM_ALLOW";
      fail = "R_DKIM_REJECT";
      temperror = "R_DKIM_TEMPFAIL";
      none = "R_DKIM_NA";
      permerror = "R_DKIM_PERMFAIL";
    }
    dmarc_symbols {
      pass = "DMARC_POLICY_ALLOW";
      permerror = "DMARC_BAD_POLICY";
      temperror = "DMARC_DNSFAIL";
      none = "DMARC_NA";
      reject = "DMARC_POLICY_REJECT";
      softfail = "DMARC_POLICY_SOFTFAIL";
      quarantine = "DMARC_POLICY_QUARANTINE";
    }
  }
}
WEB上のパスワードを設定します。
rspamadmコマンドで、パスワードを設定します。
パスワードを入れると、長い英数字が出てきます。
閲覧用パスワード
# rspamadm pw
Enter passphrase: (閲覧用パスワード)
(長い英数字)
管理用パスワード
# rspamadm pw
Enter passphrase: (管理用パスワード)
(長い英数字)
# vi /etc/rspamd/local.d/worker-controller.inc

password = " (閲覧用パスワードで出力された長い英数字)";
enable_password = "(管理用パスワードで出力された長い英数字)";
↑rspamadm コマンドで出力された英数字をファイルに保存します。
Postfix 連携
vi /etc/postfix/main.cf
# rspamd
smtpd_milters = inet:localhost:11332
milter_default_action = accept
milter_protocol = 6
↑上記の設定を加えるだけでOKです
Rspamd起動
# systemctl start rspamd
# systemctl status rspamd
● rspamd.service - rapid spam filtering system
   Loaded: loaded (/usr/lib/systemd/system/rspamd.service; enabled; vendor preset: enabled)
   Active: active (running) since Thu 2021-XX-XX XX:XX:XX JST; 4s ago
     Docs: https://rspamd.com/doc/
 Main PID: 3961 (rspamd)
    Tasks: 5 (limit: 11404)
   Memory: 132.2M
   CGroup: /system.slice/rspamd.service
           ├─3961 rspamd: main process
           ├─3962 rspamd: rspamd_proxy process (localhost:11332)
           ├─3963 rspamd: controller process (localhost:11334)
           ├─3964 rspamd: normal process (localhost:11333)
           └─3965 rspamd: hs_helper process

systemd[1]: Started rapid spam filtering system.
# systemctl enable rspamd
↑起動をして、自動起動も設定をします。
Rspamd WEB設定
# vi /etc/httpd/conf.d/userdir.conf

<Location /rspamd>
        Order allow,deny
        Allow from all
</Location>
<IfModule mod_rewrite.c>
        RewriteEngine  on
        RewriteRule ^/rspamd$ /rspamd/ [R,L]
        RewriteRule ^/rspamd/(.*) http://localhost:11334/$1 [P,L]
</IfModule>
http://(サーバーのIPアドレス)/rspamd/
で、アクセスができます。
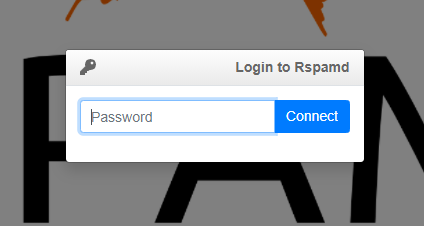
↑ブラウザからアクセスをすると、パスワードを入れる小窓が出てきます。
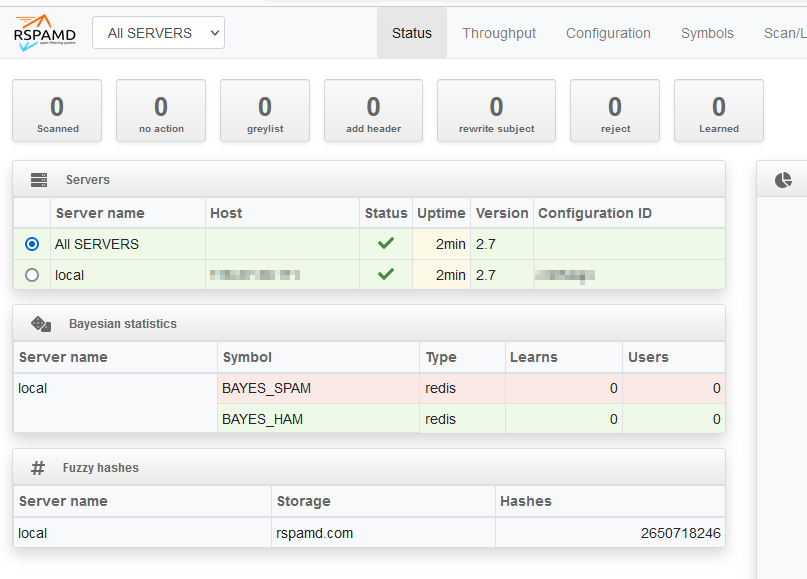
↑ログインすると、このような画面が出てきます。
DKIM
# dnf install opendkim
Updating Subscription Management repositories.
Unable to read consumer identity

This system is not registered with an entitlement server. You can use subscription-manager to register.

(略)

Installed:
  libbsd-0.9.1-4.el8.x86_64            libmemcached-libs-1.0.18-15.el8.x86_64 libopendkim-2.11.0-0.17.el8.x86_64 opendbx-1.4.6-21.el8.x86_64 opendkim-2.11.0-0.17.el8.x86_64
  sendmail-milter-8.15.2-34.el8.x86_64

Complete!
↑「opendkim」が入りました。
# mkdir /etc/opendkim/keys/(ドメイン)
# opendkim-genkey -d (ドメイン) -s (セレクタ) -D /etc/opendkim/keys/(ドメイン)/
# chown -R opendkim.opendkim /etc/opendkim/keys/(ドメイン)/
# chmod a+r /etc/opendkim/keys/(ドメイン)z/(セレクタ).*
# chmod 755 /etc/opendkim/keys/
↑特定ドメインの設定です。ドメイン毎に行います。
「セレクタ」は、「YYYYMMDD」という数字にするのが通例な感じのようです。
# vi /etc/rspamd/local.d/dkim_signing.conf

domain {
    (ドメイン) {
        selector = "(セレクタ)";
        path = "/etc/opendkim/keys/(ドメイン)/(セレクタ).private";
    }
}
use_domain = "header";
↑ドメインが増える場合は、「(ドメイン){・・・}」の部分を増やします。
# cat /etc/opendkim/keys/(ドメイン)/(セレクタ).txt
(セレクタ)._domainkey      IN      TXT ・・・
↑ 上記を、ドメインのDNSに登録をします。
DMARC
# vi /etc/rspamd/local.d/dmarc.conf

# Enables storing reporting information to redis
reporting = true;
actions = {
    quarantine = "add_header";
    reject = "reject";
}
_dmarc.(ドメイン). IN TXT "v=DMARC1; p=none;"
↑該当ドメインのDNSで、上記を設定します。
SPF
(ドメイン). IN TXT "v=spf1 ip4:XXX.XXX.XXX.XXX ip6:XX:XX:XX:XX:XX:XX:XX:XX -all"
↑SPFは、DNSの設定をするだけで有効となります。サーバーのグローバルIPを入れます。
上記では、ipv4と、ipv6の設定をしています。
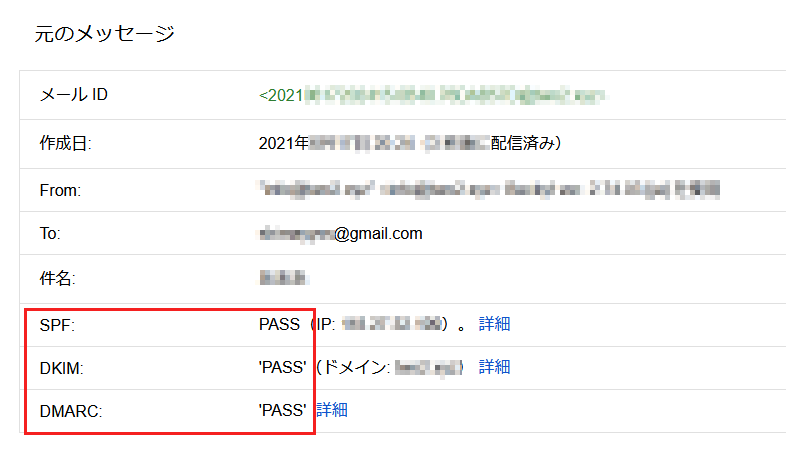
↑ SPF、DKIM、DMARC の設定がうまくいくと、gmail宛てにメールを送ると、gmail側で「PASS」と表示されます。
Rspamd メールの振り分け
外部から来たメールが、迷惑メールだと判定されたら、「.Junk」フォルダに移動させて、通常のメールボックスには、配送されない設定です。
「pigeonhole」を使います。
# wget https://pigeonhole.dovecot.org/releases/2.3/dovecot-2.3-pigeonhole-0.5.14.tar.gz
# tar xzvf dovecot-2.3-pigeonhole-0.5.14.tar.gz
# cd dovecot-2.3-pigeonhole-0.5.14/
# ./configure --with-dovecot=/usr/lib64/dovecot/

# make
# make install
# cp /usr/share/doc/dovecot/example-config/conf.d/90-sieve.conf /etc/dovecot/conf.d/
# vi /etc/dovecot/conf.d/90-sieve.conf

  #sieve_default = /var/lib/dovecot/sieve/default.sieve
  ↓
  sieve_default = /var/lib/dovecot/sieve/default.sieve
# mkdir -p /var/lib/dovecot/sieve/
# vi /var/lib/dovecot/sieve/default.sieve

require ["fileinto", "reject"];
if header :contains ["X-Spam"] "spam" {
      fileinto "Junk";
      stop;
}
if header :contains ["X-Spam-Flag"] "YES" {
      fileinto "Junk";
      stop;
}
if header :contains ["X-Spam-Status"] "YES" {
      fileinto "Junk";
      stop;
}
vi /etc/dovecot/conf.d/15-mailboxes.conf
--------------------------
  mailbox Junk {
    special_use = \Junk
  }

 ↓
  mailbox Junk {
    special_use = \Junk
    auto = subscribe
  }
--------------------------
# cd /var/lib/dovecot
# chown -R vuser.vuser sieve
# vi /etc/dovecot/local.conf

base_dir = /var/run/dovecot/
# vi /etc/dovecot/conf.d/15-lda.conf
-------------------------
protocol lda {
  # Space separated list of plugins to load (default is global mail_plugins).
  #mail_plugins = $mail_plugins
}
 ↓
protocol lda {
  # Space separated list of plugins to load (default is global mail_plugins).
  mail_plugins = $mail_plugins sieve
}
vi /etc/postfix/main.cf

dovecot_destination_recipient_limit = 1
# vi /etc/rspamd/local.d/actions.conf
# 「greylist」は設定しない・・・
greylist = null;

↑ 上記のようになった、迷惑メールは、「.Junk」フォルダに配送されて、通常のメール受信では配送されません。
許可リスト/拒否リスト(ホワイトリスト/ブラックリスト)
vi /etc/rspamd/local.d/multimap.conf

# IPアドレスで「許可」
IP_WHITELIST {
      type = "ip";
      prefilter = "true";
      map = "${LOCAL_CONFDIR}/local.d/ip_whitelist.map";
      action = "accept";
}
# ドメインで、「許可」
WHITELIST_SENDER_DOMAIN {
      type = "from";
      filter = "email:domain";
      map = "${LOCAL_CONFDIR}/local.d/whitelist_sender_domain.map";
      score = -20.0
}
# メールアドレスで、「許可」
WHITELIST_SENDER_EMAIL {
      type = "from";
      filter = "email:addr";
      map = "${LOCAL_CONFDIR}/local.d/whitelist_sender_email.map";
      score = -20.0
}
# ドメインで、「拒否」
BLACKLIST_SENDER_DOMAIN {
      type = "from";
      filter = "email:domain";
      map = "${LOCAL_CONFDIR}/local.d/blacklist_sender_domain.map";
      score = 20.0
}
# サブドメインで、「拒否」
BLACKLIST_SENDER_DOMAIN_MULTI {
      type = "from";
      filter = "email:domain:tld";
      map = "${LOCAL_CONFDIR}/local.d/blacklist_sender_domain_multi.map";
      score = 20.0
}
# メールアドレスで、「拒否」
BLACKLIST_SENDER_EMAIL {
      type = "from";
      filter = "email:addr";
      map = "${LOCAL_CONFDIR}/local.d/blacklist_sender_email.map";
      score = 20.0
}
# chown _rspamd._rspamd /etc/rspamd/local.d/
# systemctl restart rspamd
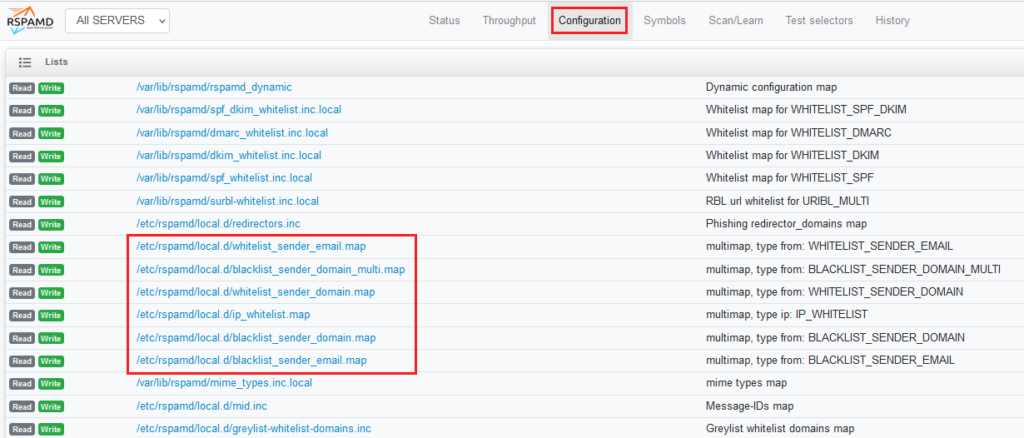
↑ 画面上からは、上記のように見えます
その他設定
迷惑メールと判断されて、「.Junk」フォルダに入ったメールを救い出す、一つの方法は、Rainloopです。
下記の設定を参考にしてみてください。