Postfix 3.6、マルチドメン版をソースからインストールします。
Postfix 3.4 + CentOS7版は、上記から
CentOS Stream8
CentOS9の中止、CentOS8のサポート短縮など、CentOS周りは、混乱気味です。
Oracle Linux 8
AlmaLinux
Rocky Linux
など、代替えのlinuxの候補が挙がっています。
昔、RedHat4の無償時代から、有償になって、CentOSが主流のような感じになったときと同じように、次世代のOSは何になるのでしょうか・・・
今回は、「CentOS Stream8」でPostfixを設定してみようと思います。
CentOS Stream8 初期設定など
今回、Conoha VPS![]() で、行いました。
で、行いました。
![]()
初期イメージOSとして、「CentOS Stream8」を選ぶ事ができます。
# uname -r
4.18.0-259.el8.x86_64

# cat /etc/centos-release
CentOS Stream release 8
↑ というバージョンが入っています。
# dnf check-update
# dnf upgrade-minimal
# dnf upgrade
↑ アップグレードをします。
# uname -r
4.18.0-305.3.1.el8.x86_64
↑ すこし、バージョンが上がりました
# dnf groupinstall "Development Tools"
↑ 開発関係のツールを入れます。
firewall
# systemctl status firewalld.service
● firewalld.service - firewalld - dynamic firewall daemon
   Loaded: loaded (/usr/lib/systemd/system/firewalld.service; enabled; vendor preset: enabled)
   Active: active (running) since Fri 2021-XX-XX XX:XX:XX JST; XXmin ago
     Docs: man:firewalld(1)
 Main PID: 744 (firewalld)
    Tasks: 2 (limit: 11403)
   Memory: 31.7M
   CGroup: /system.slice/firewalld.service
           └─744 /usr/libexec/platform-python -s /usr/sbin/firewalld --nofork --nopid

systemd[1]: Starting firewalld - dynamic firewall daemon...
systemd[1]: Started firewalld - dynamic firewall daemon.
↑ firewallサービスは、起動しています。
# firewall-cmd --list-all
public (active)
  target: default
  icmp-block-inversion: no
  interfaces: eth0
  sources:
  services: cockpit dhcpv6-client ssh
  ports:
  protocols:
  forward: no
  masquerade: no
  forward-ports:
  source-ports:
  icmp-blocks:
  rich rules:
↑ デフォルトは、今までと変わりありません
MySQL
# dnf info mysql-server.x86_64
Last metadata expiration check: 0:46:13 ago on Fri 04 Jun 2021 12:19:29 PM JST.
Available Packages
Name         : mysql-server
Version      : 8.0.21
Release      : 1.module_el8.4.0+589+11e12751
Architecture : x86_64
Size         : 22 M
Source       : mysql-8.0.21-1.module_el8.4.0+589+11e12751.src.rpm
Repository   : appstream
Summary      : The MySQL server and related files
URL          : http://www.mysql.com
License      : GPLv2 with exceptions and LGPLv2 and BSD
Description  : MySQL is a multi-user, multi-threaded SQL database server. MySQL is a
             : client/server implementation consisting of a server daemon (mysqld)
             : and many different client programs and libraries. This package contains
             : the MySQL server and some accompanying files and directories.
↑ MySQL 8.0.21
をインストールできます。
# dnf install mysql-server.x86_64
Last metadata expiration check: 0:46:51 ago on Fri 04 Jun 2021 12:19:29 PM JST.
Dependencies resolved.

(略)

Installed:
  mariadb-connector-c-config-3.1.11-2.el8_3.noarch                                  mecab-0.996-1.module_el8.4.0+589+11e12751.9.x86_64
  mysql-8.0.21-1.module_el8.4.0+589+11e12751.x86_64                                 mysql-common-8.0.21-1.module_el8.4.0+589+11e12751.x86_64
  mysql-errmsg-8.0.21-1.module_el8.4.0+589+11e12751.x86_64                          mysql-server-8.0.21-1.module_el8.4.0+589+11e12751.x86_64
  protobuf-lite-3.5.0-13.el8.x86_64

Complete!


# mysqld --version
/usr/libexec/mysqld  Ver 8.0.21 for Linux on x86_64 (Source distribution)
↑ MySQL 8.0がインストールされました。
# systemctl start mysqld.service
# systemctl enable mysqld.service
Created symlink /etc/systemd/system/multi-user.target.wants/mysqld.service → /usr/lib/systemd/system/mysqld.service.
↑ サービスを起動して、自動起動も設定をします。
MySQLの初期設定をしていきます。
# mysql_secure_installation

Securing the MySQL server deployment.

Connecting to MySQL using a blank password.

VALIDATE PASSWORD COMPONENT can be used to test passwords
and improve security. It checks the strength of password
and allows the users to set only those passwords which are
secure enough. Would you like to setup VALIDATE PASSWORD component?

Press y|Y for Yes, any other key for No: y
↑「y」を押します。(あるいは、Enterキーを押します)
There are three levels of password validation policy:

LOW    Length >= 8
MEDIUM Length >= 8, numeric, mixed case, and special characters
STRONG Length >= 8, numeric, mixed case, special characters and dictionary                  file

Please enter 0 = LOW, 1 = MEDIUM and 2 = STRONG: 2
↑ パスワードの強度を設定します。「2」を入れます。
Please set the password for root here.

New password: (パスワード)

Re-enter new password: (パスワード)
↑ パスワードを入れます。
Estimated strength of the password: 100
Do you wish to continue with the password provided?(Press y|Y for Yes, any other key for No) : y
↑ パスワードの強度として、強い「100」となりましたので、このまま「y」を押して次に進めます。
By default, a MySQL installation has an anonymous user,
allowing anyone to log into MySQL without having to have
a user account created for them. This is intended only for
testing, and to make the installation go a bit smoother.
You should remove them before moving into a production
environment.

Remove anonymous users? (Press y|Y for Yes, any other key for No) : y
Success.


Normally, root should only be allowed to connect from
'localhost'. This ensures that someone cannot guess at
the root password from the network.

Disallow root login remotely? (Press y|Y for Yes, any other key for No) : y
Success.

By default, MySQL comes with a database named 'test' that
anyone can access. This is also intended only for testing,
and should be removed before moving into a production
environment.


Remove test database and access to it? (Press y|Y for Yes, any other key for No) : y
 - Dropping test database...
Success.

 - Removing privileges on test database...
Success.

Reloading the privilege tables will ensure that all changes
made so far will take effect immediately.

Reload privilege tables now? (Press y|Y for Yes, any other key for No) : y
Success.

All done!
↑ その他、そのまま、リターンキーを押して、進めます。
# mysql -u root -p
Enter password:
Welcome to the MySQL monitor.  Commands end with ; or \g.
Your MySQL connection id is 10
Server version: 8.0.21 Source distribution

Copyright (c) 2000, 2020, Oracle and/or its affiliates. All rights reserved.

Oracle is a registered trademark of Oracle Corporation and/or its
affiliates. Other names may be trademarks of their respective
owners.

Type 'help;' or '\h' for help. Type '\c' to clear the current input statement.

mysql> show databases;
+--------------------+
| Database           |
+--------------------+
| information_schema |
| mysql              |
| performance_schema |
| sys                |
+--------------------+
4 rows in set (0.01 sec)

mysql> show variables like 'character%';
+--------------------------+----------------------------+
| Variable_name            | Value                      |
+--------------------------+----------------------------+
| character_set_client     | utf8mb4                    |
| character_set_connection | utf8mb4                    |
| character_set_database   | utf8mb4                    |
| character_set_filesystem | binary                     |
| character_set_results    | utf8mb4                    |
| character_set_server     | utf8mb4                    |
| character_set_system     | utf8                       |
| character_sets_dir       | /usr/share/mysql/charsets/ |
+--------------------------+----------------------------+
8 rows in set (0.01 sec)

mysql>
↑ ログインができました。
ライブラリなどのインストール
# dnf install mysql-devel


(略)

Installed:
  keyutils-libs-devel-1.5.10-6.el8.x86_64     krb5-devel-1.18.2-10.el8.x86_64                             libcom_err-devel-1.45.6-1.el8.x86_64
  libkadm5-1.18.2-10.el8.x86_64               libselinux-devel-2.9-5.el8.x86_64                           libsepol-devel-2.9-2.el8.x86_64
  libverto-devel-0.3.0-5.el8.x86_64           mysql-devel-8.0.21-1.module_el8.4.0+589+11e12751.x86_64     mysql-libs-8.0.21-1.module_el8.4.0+589+11e12751.x86_64
  openssl-devel-1:1.1.1k-1.el8.x86_64         pcre2-devel-10.32-2.el8.x86_64                              pcre2-utf16-10.32-2.el8.x86_64
  pcre2-utf32-10.32-2.el8.x86_64

Complete!
# dnf --enablerepo=powertools install libnsl2-devel
icu4c
ICU (International Components for Unicode) とは、Unicodeの文字変換ライブラリ
「ICU4C」は、C言語版
「ICU4J」は、Java版
今回、

から、C言語版の最新版をダウンロードします。
# wget https://github.com/unicode-org/icu/releases/download/release-69-1/icu4c-69_1-src.tgz

# cd icu/source

# ./runConfigureICU Linux
# make
# make install
Berkeley DB

からダウンロードをします。
# wget http://download.oracle.com/berkeley-db/db-6.2.32.tar.gz

# tar xzvf db-6.2.32.tar.gz
# cd db-6.2.32/build_unix/
# ../dist/configure --prefix=/usr/
# make
# make install
Berkeley DB 最新版
余談的な事です。読み飛ばしても大丈夫です。
Berkeley DB、現時点での最新版は、18.1.40です。
https://download.oracle.com/otn/berkeley-db/db-18.1.40.tar.gz
をダウンロードして、インストールをしてみます。
Installing documentation: /usr/docs ...
cp: cannot stat 'bdb-sql': No such file or directory
cp: cannot stat 'gsg_db_server': No such file or directory
make: *** [Makefile:1310: install_docs] Error 1
上記、「documentationをインストールできない」というエラー・・・
これは、18.1.40のバグという情報もあり・・・
ドキュメントだけなので、古いのをコピーすればいいという情報も・・・
面倒なので
一つ古い18.1.32を使います。
oracleアカウントログイン後、
https://download.oracle.com/otn/berkeley-db/db-18.1.32.tar.gz
にアクセスすれば、ダウンロードができます。
# tar xzvf db-18.1.32.tar.gz
# cd db-18.1.32/build_unix/
# ../dist/configure --prefix=/usr/
# make
# make install

(略)

See any operating system documentation about shared libraries for
more information, such as the ld(1) and ld.so(8) manual pages.
----------------------------------------------------------------------
Installing DB utilities: /usr/bin ...
libtool: install: cp -p .libs/db_archive /usr/bin/db_archive
libtool: install: cp -p .libs/db_checkpoint /usr/bin/db_checkpoint
libtool: install: cp -p .libs/db_convert /usr/bin/db_convert
libtool: install: cp -p .libs/db_deadlock /usr/bin/db_deadlock
libtool: install: cp -p .libs/db_dump /usr/bin/db_dump
libtool: install: cp -p .libs/db_hotbackup /usr/bin/db_hotbackup
libtool: install: cp -p .libs/db_load /usr/bin/db_load
libtool: install: cp -p .libs/db_log_verify /usr/bin/db_log_verify
libtool: install: cp -p .libs/db_printlog /usr/bin/db_printlog
libtool: install: cp -p .libs/db_recover /usr/bin/db_recover
libtool: install: cp -p .libs/db_replicate /usr/bin/db_replicate
libtool: install: cp -p .libs/db_stat /usr/bin/db_stat
libtool: install: cp -p .libs/db_tuner /usr/bin/db_tuner
libtool: install: cp -p .libs/db_upgrade /usr/bin/db_upgrade
libtool: install: cp -p .libs/db_verify /usr/bin/db_verify
Installing documentation: /usr/docs ...
↑ インストールができました。
しかし、Postfix 3.6 インストール時に、
# make install
dict_db.c: In function ‘dict_db_open’:
dict_db.c:768:2: error: #error "Unsupported Berkeley DB version"
 #error "Unsupported Berkeley DB version"
  ^~~~~
make: *** [Makefile:195: dict_db.o] Error 1
make: *** [Makefile:95: update] Error 1
↑ と、エラーが出てきます。
「Berkeley DBのバージョンがサポートされていない」と出てきます。
# vi src/util/dict_db.c

#if DB_VERSION_MAJOR == 6 || DB_VERSION_MAJOR == 5 || \
        (DB_VERSION_MAJOR == 4 && DB_VERSION_MINOR > 0)
    if ((errno = db->open(db, 0, sane_basename(db_base_buf, db_path),
                          0, type, db_flags, 0644)) != 0)
        FREE_RETURN(dict_surrogate(class, path, open_flags, dict_flags,
                                   "open database %s: %m", db_path));
#elif (DB_VERSION_MAJOR == 3 || DB_VERSION_MAJOR == 4)
    if ((errno = db->open(db, sane_basename(db_base_buf, db_path), 0,
                          type, db_flags, 0644)) != 0)
        FREE_RETURN(dict_surrogate(class, path, open_flags, dict_flags,
                                   "open database %s: %m", db_path));
#else
#error "Unsupported Berkeley DB version"
#endif
と、C言語のソースを見てみると、version 6より新しいものは、サポートされないようです・・・
Postfix 3.6
Postfix 3.6からは、openssl 1.1.1以上が必要なので、
デフォルトのCentOS7では、インストールはできないでしょう。
# groupadd postfix
# useradd -g postfix -s /sbin/nologin postfix
# groupadd postdrop
# cd postfix-3.6.0/

# make makefiles CCARGS='-DUSE_TLS -DUSE_SASL_AUTH -DHAS_MYSQL -DDEF_SERVER_SASL_TYPE=\"dovecot\" -I/usr/local/include -I/usr/include/mysql/' AUXLIBS="-lssl -lcrypto -L/usr/local/lib" 'AUXLIBS_MYSQL=-L/usr/lib64/mysql -lmysqlclient -lz -lm'

# make
# make install

(略)
Updating /usr/local/man/man8/verify.8...
Updating /usr/local/man/man8/virtual.8...
postfix: warning: smtputf8_enable is true, but EAI support is not compiled in

    Warning: you still need to edit myorigin/mydestination/mynetworks
    parameter settings in /etc/postfix/main.cf.

    See also http://www.postfix.org/STANDARD_CONFIGURATION_README.html
    for information about dialup sites or about sites inside a firewalled
    network.

    BTW: Check your /etc/aliases file and be sure to set up aliases
    that send mail for root and postmaster to a real person, then run
    /usr/bin/newaliases.
↑ インストールできました。
# postfix start
postfix: warning: smtputf8_enable is true, but EAI support is not compiled in
postsuper: warning: smtputf8_enable is true, but EAI support is not compiled in
postfix/postlog: warning: smtputf8_enable is true, but EAI support is not compiled in
postfix/postfix-script: starting the Postfix mail system
# ps ax |grep post
  59309 ?        Ss     0:00 /usr/libexec/postfix/master -w
↑ 起動はできました。
PostfixAdmin関係
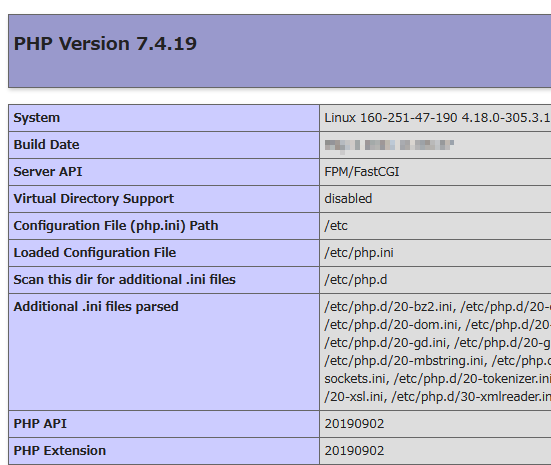
php 7.4
# dnf module list php
Updating Subscription Management repositories.
Unable to read consumer identity

This system is not registered with an entitlement server. You can use subscription-manager to register.

Last metadata expiration check: 1 day, 4:26:32 ago on Sun 06 Jun 2021 10:05:22 AM JST.
CentOS Stream 8 - AppStream
Name                         Stream                          Profiles                                           Summary
php                          7.2 [d]                         common [d], devel, minimal                         PHP scripting language
php                          7.3                             common [d], devel, minimal                         PHP scripting language
php                          7.4                             common [d], devel, minimal                         PHP scripting language

Hint: [d]efault, [e]nabled, [x]disabled, [i]nstalled
↑ php 7.4がインストールできます。
# dnf module install php:7.4
Updating Subscription Management repositories.
Unable to read consumer identity


(略)

Installed:
  httpd-filesystem-2.4.37-39.module_el8.4.0+778+c970deab.noarch                 nginx-filesystem-1:1.14.1-9.module_el8.0.0+184+e34fea82.noarch
  oniguruma-6.8.2-2.el8.x86_64                                                  php-cli-7.4.19-1.module_el8.5.0+815+1c4fd2e5.x86_64
  php-common-7.4.19-1.module_el8.5.0+815+1c4fd2e5.x86_64                        php-fpm-7.4.19-1.module_el8.5.0+815+1c4fd2e5.x86_64
  php-json-7.4.19-1.module_el8.5.0+815+1c4fd2e5.x86_64                          php-mbstring-7.4.19-1.module_el8.5.0+815+1c4fd2e5.x86_64
  php-xml-7.4.19-1.module_el8.5.0+815+1c4fd2e5.x86_64

Complete!
↑ php 7.4.19 がインストールできました
# systemctl start php-fpm
# systemctl status php-fpm
● php-fpm.service - The PHP FastCGI Process Manager
   Loaded: loaded (/usr/lib/systemd/system/php-fpm.service; disabled; vendor preset: disabled)
   Active: active (running) since Mon 2021-XX-XX XX:XX:XX JST; 2s ago
 Main PID: 2294 (php-fpm)
   Status: "Ready to handle connections"
    Tasks: 6 (limit: 11403)
   Memory: 9.7M
   CGroup: /system.slice/php-fpm.service
           ├─2294 php-fpm: master process (/etc/php-fpm.conf)
           ├─2295 php-fpm: pool www
           ├─2296 php-fpm: pool www
           ├─2297 php-fpm: pool www
           ├─2298 php-fpm: pool www
           └─2299 php-fpm: pool www

systemd[1]: Starting The PHP FastCGI Process Manager...
systemd[1]: Started The PHP FastCGI Process Manager.
↑ php-fpm、起動できました。
# dnf install php-zip
# dnf install php-gd
# dnf install php-pdo
# dnf install php-mysqlnd
その他、必要なものは、
# dnf list|grep php
で探すと便利です。
httpd 2.4 (apache 2.4)
# dnf list |grep httpd
httpd-filesystem.noarch                                2.4.37-39.module_el8.4.0+778+c970deab             @appstream
centos-logos-httpd.noarch                              85.5-1.el8                                        appstream
httpd.x86_64                                           2.4.37-39.module_el8.4.0+778+c970deab             appstream
httpd-devel.x86_64                                     2.4.37-39.module_el8.4.0+778+c970deab             appstream
httpd-manual.noarch                                    2.4.37-39.module_el8.4.0+778+c970deab             appstream
httpd-tools.x86_64                                     2.4.37-39.module_el8.4.0+778+c970deab             appstream
keycloak-httpd-client-install.noarch                   1.0-2.el8                                         appstream
libmicrohttpd.i686                                     1:0.9.59-2.el8                                    baseos
libmicrohttpd.x86_64                                   1:0.9.59-2.el8                                    baseos
python3-keycloak-httpd-client-install.noarch           1.0-2.el8                                         appstream


# dnf install httpd httpd-tools httpd-devel
Updating Subscription Management repositories.
Unable to read consumer identity


(略)

Installed:
  apr-1.6.3-11.el8.x86_64                                                       apr-devel-1.6.3-11.el8.x86_64
  apr-util-1.6.1-6.el8.x86_64                                                   apr-util-bdb-1.6.1-6.el8.x86_64
  apr-util-devel-1.6.1-6.el8.x86_64                                             apr-util-openssl-1.6.1-6.el8.x86_64
  centos-logos-httpd-85.5-1.el8.noarch                                          cyrus-sasl-2.1.27-5.el8.x86_64
  cyrus-sasl-devel-2.1.27-5.el8.x86_64                                          expat-devel-2.2.5-4.el8.x86_64
  httpd-2.4.37-39.module_el8.4.0+778+c970deab.x86_64                            httpd-devel-2.4.37-39.module_el8.4.0+778+c970deab.x86_64
  httpd-tools-2.4.37-39.module_el8.4.0+778+c970deab.x86_64                      libdb-devel-5.3.28-40.el8.x86_64
  mod_http2-1.15.7-3.module_el8.4.0+778+c970deab.x86_64                         openldap-devel-2.4.46-16.el8.x86_64

Complete!

# httpd -v
Server version: Apache/2.4.37 (centos)
Server built:   May 20 2021 04:33:06
↑ httpd 2.4.37 が入りました。
# systemctl start httpd
# systemctl status httpd
● httpd.service - The Apache HTTP Server
   Loaded: loaded (/usr/lib/systemd/system/httpd.service; disabled; vendor preset: disabled)
  Drop-In: /usr/lib/systemd/system/httpd.service.d
           └─php-fpm.conf
   Active: active (running) since Mon 2021-XX-XX XX:XX:XX JST; 1s ago
     Docs: man:httpd.service(8)
 Main PID: 5824 (httpd)
   Status: "Started, listening on: port 80"
    Tasks: 213 (limit: 11403)
   Memory: 31.5M
   CGroup: /system.slice/httpd.service
           ├─5824 /usr/sbin/httpd -DFOREGROUND
           ├─5825 /usr/sbin/httpd -DFOREGROUND
           ├─5826 /usr/sbin/httpd -DFOREGROUND
           ├─5827 /usr/sbin/httpd -DFOREGROUND
           └─5828 /usr/sbin/httpd -DFOREGROUND

systemd[1]: Starting The Apache HTTP Server...
↑ httpdが起動しました
httpd用 firewall
# firewall-cmd --permanent --add-service=http
success
# firewall-cmd --permanent --add-service=https
success
# firewall-cmd --reload
success
# firewall-cmd --list-all
public (active)
  target: default
  icmp-block-inversion: no
  interfaces: eth0
  sources:
  services: cockpit dhcpv6-client http https ssh
  ports:
  protocols:
  forward: no
  masquerade: no
  forward-ports:
  source-ports:
  icmp-blocks:
  rich rules:
↑ firewallの設定完了です
web設定
# vi /etc/httpd/conf/httpd.conf

#ServerName www.example.com:80
 ↓
ServerName 127.0.0.1:80
# vi /etc/httpd/conf/httpd.conf

<FilesMatch \.php$>
        SetHandler "proxy:unix:/run/php-fpm/www.sock|fcgi://localhost"
</FilesMatch>
↑ phpに関する行を加えます。
↑ phpが認識されました。
postfix admin 本体
 # wget https://sourceforge.net/projects/postfixadmin/files/postfixadmin-3.3.8/PostfixAdmin%203.3.8.tar.gz/download -O PostfixAdmin.3.3.8.tar.gz

# tar xzvf PostfixAdmin.3.3.8.tar.gz

# cp -a postfixadmin-postfixadmin-7d04685/ /var/www/postfixadmin
# vi /etc/httpd/conf/httpd.conf
Alias /postfixadmin "/var/www/postfixadmin/public"
PostfixAdmin用DB作成
# mysql -u root -p

mysql> use mysql;
Reading table information for completion of table and column names
You can turn off this feature to get a quicker startup with -A

Database changed
mysql> insert into user (host,User,authentication_string,ssl_cipher,x509_issuer,x509_subject) values ('localhost','(DB用ユーザ)','','','','');
Query OK, 1 row affected (0.00 sec)

mysql> flush privileges;
Query OK, 0 rows affected (0.00 sec)

mysql> ALTER USER '(DB用ユーザ)'@'localhost' IDENTIFIED BY '(DB用パスワード)';
Query OK, 0 rows affected (0.01 sec)

mysql> flush privileges;
Query OK, 0 rows affected (0.00 sec)


mysql> insert into db (host,db,user) values ('localhost','(DB名)','(DB用ユーザ)');
Query OK, 1 row affected (0.01 sec)

mysql> update db set Select_priv='Y',Insert_priv='Y',Update_priv='Y',Delete_priv='Y',Create_priv='Y',Drop_priv='Y',Grant_priv='Y',References_priv='Y',Index_priv='Y',Alter_priv='Y',Create_tmp_table_priv='Y',Lock_tables_priv='Y',Create_view_priv='Y',Show_view_priv='Y',Create_routine_priv='Y',Alter_routine_priv='Y',Execute_priv='Y',Event_priv='Y',Trigger_priv='Y' where db='(DB名)';
Query OK, 1 row affected (0.00 sec)
Rows matched: 1  Changed: 1  Warnings: 0

mysql> create database (DB名);
Query OK, 1 row affected (0.01 sec)

mysql> flush privileges;
Query OK, 0 rows affected (0.01 sec)
Postfixadminの設定
# cd /var/www/postfixadmin
# vi config.local.php

<?php
$CONF['configured'] = true;
$CONF['default_language'] = 'ja';
$CONF['database_user'] = '(DB用ユーザ)';
$CONF['database_password'] = '(DB用パスワード)';
$CONF['database_name'] = '(DB名)';
$CONF['database_socket'] = '/var/lib/mysql/mysql.sock';
$CONF['admin_email'] = '(メールアドレス)';
$CONF['quota'] = 'YES';
?>
# cd /var/www/postfixadmin
# mkdir templates_c
# chmod 777 templates_c
Postfixadminの設定 ブラウザ
セットアップパスワード
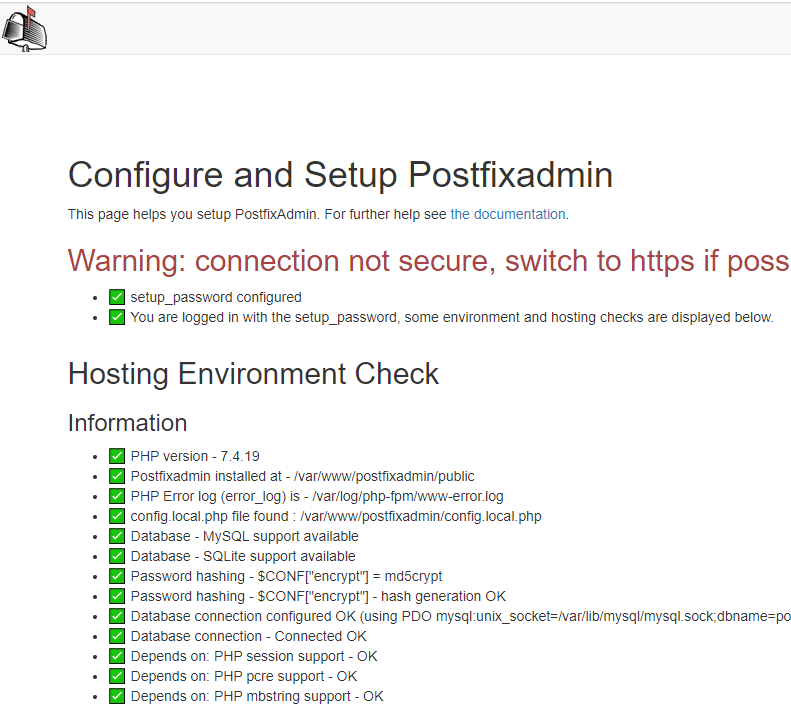
http://(サーバーIPアドレス)/postfixadmin/setup.php
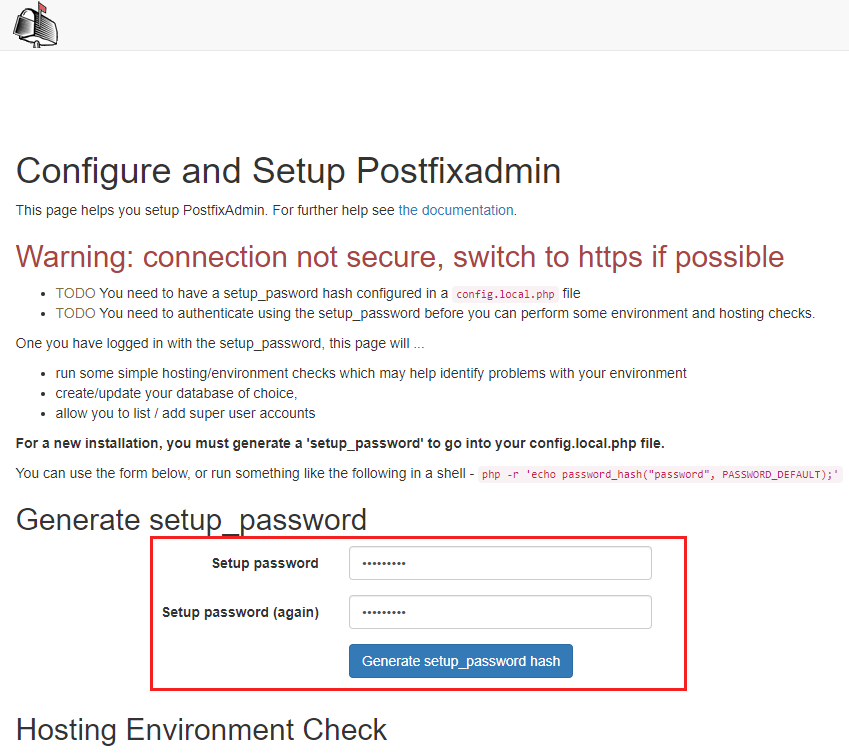
↑ ブラウザで、アクセスをして、セットアップを実行します。
「Setup password」
「Setup password (again)」
に、セットアップ用のパスワードを入れて、
「Generate setup_password hash」
を押します。
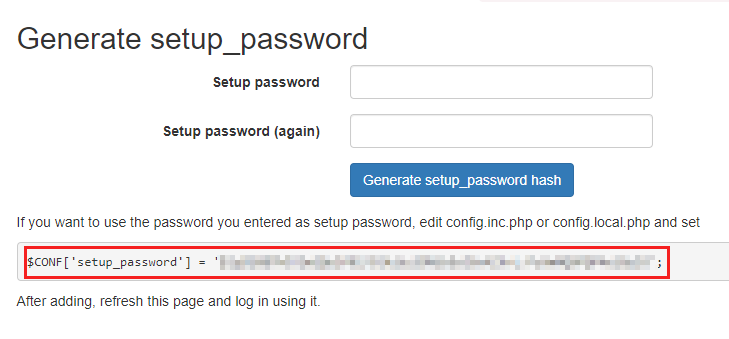
↑ 画面下に「$CONF[‘setup_password’] = ‘(英数字の長い文字列)’;」
と、出てきます。
この行を
「config.local.php」
に追加します。
SuperAdmin アカウント
再び
http://(サーバーのIPアドレス)/postfixadmin/setup.php
にアクセスします
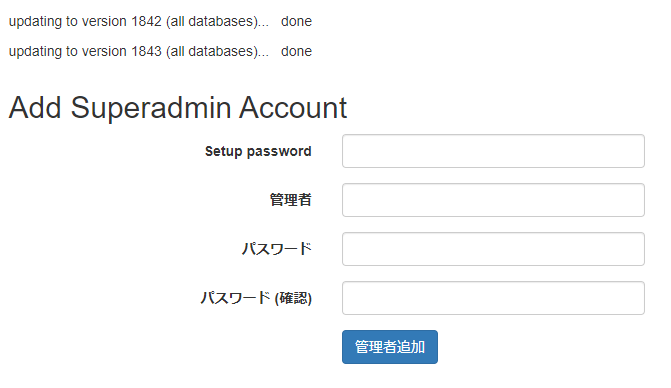
↑ 画面下に「Add Superadmin Account」がありますので、
先ほど入力をした、「セットアップパスワード」と、管理者のメールアドレスとパスワードを入れます。
そして、「管理者追加」を押します。

↑ 管理者が追加されました
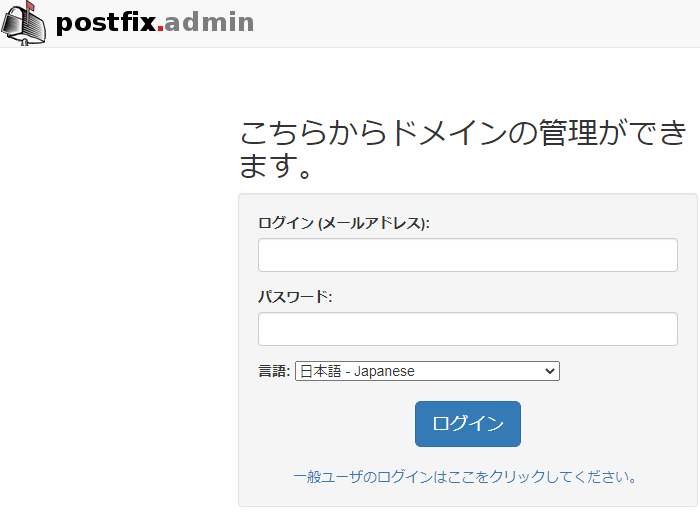
↑ http://(サーバーIPアドレス)/postfixadmin/
からログインができます。
バーチャルドメイン用 postfixの設定
# groupadd -g 10000 vuser
# useradd -g vuser -u 10000 vuser
# mkdir /mail
# chown vuser:vuser /mail
# chmod 771 /mail
# vi /etc/postfix/mysql_virtual_alias_maps.cf

user = (DB用ユーザ)
password = (DB用パスワード)
hosts = localhost
dbname = (DB名)
table = alias
select_field = goto
where_field = address
# vi /etc/postfix/mysql_virtual_domains_maps.cf

user = (DB用ユーザ)
password = (DB用パスワード)
hosts = localhost
dbname = (DB名)
table = domain
select_field = domain
where_field = domain
additional_conditions = and active = '1'
# vi /etc/postfix/mysql_virtual_mailbox_maps.cf

user = (DB用ユーザ)
password = (DB用パスワード)
hosts = localhost
dbname = (DB名)
table = mailbox
select_field = maildir
where_field = username
# chown :postfix /etc/postfix/mysql_virtual_*
# chmod 640 /etc/postfix/mysql_virtual_*
# vi /etc/postfix/main.cf

myhostname = (ホスト名)
mydomain = (ドメイン名)

myorigin = $myhostname
relay_domains = $mydestination

home_mailbox = Maildir/

local_transport = local
virtual_transport = virtual
virtual_mailbox_base = /mail
virtual_alias_maps = mysql:/etc/postfix/mysql_virtual_alias_maps.cf
virtual_alias_domains = $virtual_alias_maps
virtual_mailbox_domains = mysql:/etc/postfix/mysql_virtual_domains_maps.cf
virtual_mailbox_maps = mysql:/etc/postfix/mysql_virtual_mailbox_maps.cf
virtual_minimum_uid = 10000
virtual_uid_maps = static:10000
virtual_gid_maps = static:10000

minimal_backoff_time = 100s
maximal_backoff_time = 800s
bounce_queue_lifetime = 24h
maximal_queue_lifetime = 24h
queue_run_delay = 100s

message_size_limit = 120480000
mailbox_size_limit = 120480000

smtpd_sasl_auth_enable = yes
smtpd_sasl_security_options = noanonymous
smtpd_sasl_type = dovecot
smtpd_sasl_path = private/auth
smtpd_sasl_local_domain = $myhostname
smtpd_relay_restrictions = permit_mynetworks,  permit_sasl_authenticated, permit_auth_destination, reject_unauth_destination, reject

smtputf8_enable=no
メール用firewall設定
# firewall-cmd --permanent --add-service=pop3
# firewall-cmd --permanent --add-service=pop3s
# firewall-cmd --permanent --add-service=smtp-submission
# firewall-cmd --permanent --add-service=smtp
# firewall-cmd --permanent --add-service=smtps
# firewall-cmd --permanent --add-service=imap
# firewall-cmd --permanent --add-service=imaps
# firewall-cmd --reload
postfix 起動
vi /etc/systemd/system/postfix.service

[Unit]
Description=postfix
After=network.target
[Service]
Type=simple
RemainAfterExit=yes
ExecStart=/usr/sbin/postfix start
ExecStop=/usr/sbin/postfix stop
[Install]
WantedBy=multi-user.target
# systemctl restart postfix
# systemctl status postfix
● postfix.service - postfix
   Loaded: loaded (/etc/systemd/system/postfix.service; disabled; vendor preset: disabled)
   Active: active (exited) since Tue 2021-XX-XX XX:XX:XX JST; 3s ago
  Process: 1907 ExecStop=/usr/sbin/postfix stop (code=exited, status=0/SUCCESS)
  Process: 1919 ExecStart=/usr/sbin/postfix start (code=exited, status=0/SUCCESS)
 Main PID: 1919 (code=exited, status=0/SUCCESS)
    Tasks: 3 (limit: 11404)
   Memory: 4.2M
   CGroup: /system.slice/postfix.service
           ├─1986 /usr/libexec/postfix/master -w
           ├─1987 pickup -l -t unix -u
           └─1988 qmgr -l -t unix -u

systemd[1]: Started postfix.
postfix/master[1986]: daemon started -- version 3.6.0, configuration /etc/postfix
メールアドレス設定
PostfixAdminの画面から、ドメインとメールアドレスを設定してみます。
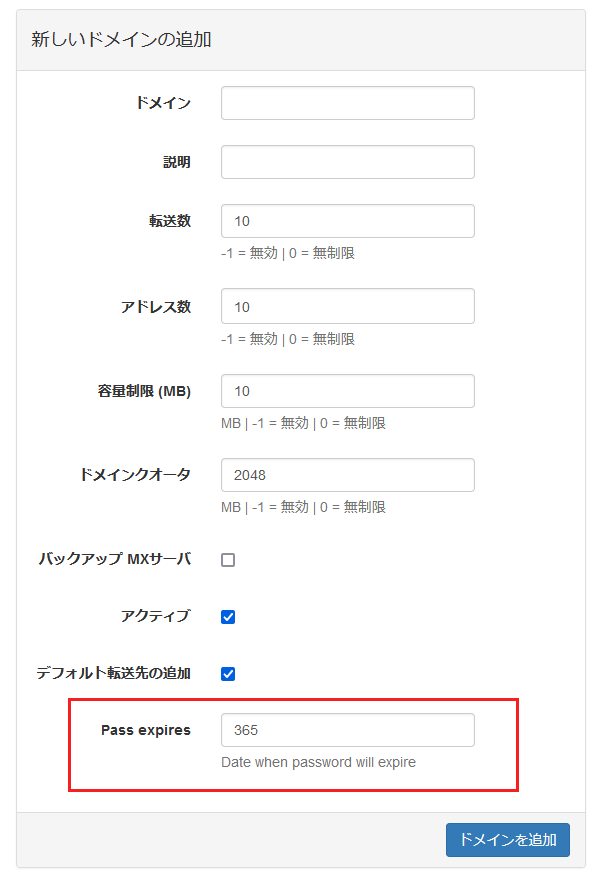
↑ドメイン登録時に「Pass expires」という欄が加わっています。
version 3.3から加わったようです。
日数(数字)を入れます
無効にしたい場合は、
$CONF['password_expiration_enable'] = 'NO';
$CONF['password_expiration'] = 'NO';
↑ を、「config.local.php」に、入れるといいようです。
メールを登録して
# mail info@(ドメイン)
Subject: test
test
.
EOT
↑ とメールをうってみます。
# ls -al /mail/(ドメイン)/info/new/
total 12
drwx------ 2 vuser vuser 4096 Jun  8 XX:XX .
drwx------ 5 vuser vuser 4096 Jun  8 XX:XX ..
-rw------- 1 vuser vuser  478 Jun  8 XX:XX xxx.xxxx.xxxx-xx-xx-xx
↑ とメールが到着しました。
次の作業