AlmaLinuxで、Djangoの初期設定を行ってみました。
AlmaLinux 8.4 & python3
# ls -al /etc/centos-release
lrwxrwxrwx. 1 root root 17 May 26 08:38 /etc/centos-release -> almalinux-release

# cat /etc/almalinux-release
AlmaLinux release 8.4 (Electric Cheetah)
↑/etc/centos-release hのファイルは、/etc/almalinux-release へのシンボリックリンクになっています。
8.4というバージョンです。
# whichi python3
/usr/bin/python3
# ls -al /usr/bin/python3
lrwxrwxrwx. 1 root root 25 May 27 17:49 /usr/bin/python3 -> /etc/alternatives/python3
# ls -al /etc/alternatives/python3
lrwxrwxrwx. 1 root root 18 May 27 17:49 /etc/alternatives/python3 -> /usr/bin/python3.6
# python3 --version
Python 3.6.8
↑ python 3.6 が入っています。
ソフトアップグレード
# dnf check-update
# dnf upgrade-minimal
↑ソフトをアップグレードします。
# uname -a
Linux (ホスト名) 4.18.0-305.el8.x86_64 #1 SMP Wed May 19 18:55:28 EDT 2021 x86_64 x86_64 x86_64 GNU/Linux
# dnf groupinstall "Development Tools"
↑開発用ツールを入れます。
firewall
# systemctl status firewalld.service
● firewalld.service - firewalld - dynamic firewall daemon
   Loaded: loaded (/usr/lib/systemd/system/firewalld.service; enabled; vendor preset: enabled)
   Active: active (running) since Sat 2021-XX-XX XX:XX:XX JST; 5min ago
     Docs: man:firewalld(1)
 Main PID: 12109 (firewalld)
    Tasks: 3 (limit: 11396)
   Memory: 25.9M
   CGroup: /system.slice/firewalld.service
           └─12109 /usr/libexec/platform-python -s /usr/sbin/firewalld --nofork --nopid
systemd[1]: Starting firewalld - dynamic firewall daemon...
systemd[1]: Started firewalld - dynamic firewall daemon.
↑firewallは、標準で稼働をしています。
Python3 仮想環境
# dnf install python3-virtualenv
Last metadata expiration check: 0:XX:XX ago on XXX XX XXX 2021 XX:XX:XX XX JST.
Dependencies resolved

(略)

Installed:
  platform-python-devel-3.6.8-37.el8.alma.x86_64
  python3-rpm-generators-5-6.el8.noarch
  python3-virtualenv-15.1.0-19.module_el8.3.0+6191+6b4b10ec.noarch
  python3-wheel-wheel-1:0.31.1-2.module_el8.3.0+6191+6b4b10ec.noarch
  python36-devel-3.6.8-2.module_el8.3.0+6191+6b4b10ec.x86_64

Complete!
↑仮想環境がインストールされました。
仮想環境の作成
仮想環境を作成します。
virtualenv (環境の名前)
と、「virtualenv」のあとに、適当な名称で指定します。
# useradd (一般ユーザ)
# su - (一般ユーザ)
↑一般ユーザを作成して、そのユーザで仮想環境を作成します。
[(一般ユーザ)@(ホスト名) ~]$ virtualenv venv
Using base prefix '/usr'
New python executable in /home/(一般ユーザ)/venv/bin/python3.6
Also creating executable in /home/(一般ユーザ)/venv/bin/python
Installing setuptools, pip, wheel...done.
↑仮想環境が作成されました。
仮想環境に入ります。
[(一般ユーザ)@(ホスト名) ~]$ source venv/bin/activate
(venv) [(一般ユーザ)@(ホスト名) ~]$
↑「source venv/bin/activate」というコマンドで、仮想環境に入ります。仮想環境に入ると先頭に「(仮想環境名)」(venv)が表示されます。
さて、目的の「django」をインストールします。
(venv) [(一般ユーザ)@(ホスト名) ~]$ pip install django
Collecting django
  Downloading Django-3.2.6-py3-none-any.whl (7.9 MB)
     |■■■■■■■■■■■■■■| 7.9 MB 19.8 MB/s
Collecting asgiref<4,>=3.3.2
  Downloading asgiref-3.4.1-py3-none-any.whl (25 kB)
Collecting sqlparse>=0.2.2
  Downloading sqlparse-0.4.1-py3-none-any.whl (42 kB)
     |■■■■■■■■■■■■■■| 42 kB 2.3 MB/s
Collecting pytz
  Downloading pytz-2021.1-py2.py3-none-any.whl (510 kB)
     |■■■■■■■■■■■■■■| 510 kB 80.2 MB/s
Collecting typing-extensions
  Downloading typing_extensions-3.10.0.0-py3-none-any.whl (26 kB)
Installing collected packages: typing-extensions, sqlparse, pytz, asgiref, django
Successfully installed asgiref-3.4.1 django-3.2.6 pytz-2021.1 sqlparse-0.4.1 typing-extensions-3.10.0.0
↑最新安定版のdjango 3.2.6が入りました。
pip install django==3.0
↑バージョンを指定する場合、「==3.0」などと指定をします。
(venv) [(一般ユーザ)@(ホスト名) ~]$ deactivate
[(一般ユーザ)@(ホスト名) ~]$
↑仮想環境から、抜ける場合は、「deactivate」を実行します。
プロジェクトの作成
プロジェクト名を「mysite」として、作成します。
(venv) [(一般ユーザ)@(ホスト名) ~]$ django-admin startproject mysite
(venv) [(一般ユーザ)@(ホスト名) ~]$ cd mysite/
(venv) [(一般ユーザ)@(ホスト名) mysite]$ python manage.py migrate
Operations to perform:
  Apply all migrations: admin, auth, contenttypes, sessions
Running migrations:
  Applying contenttypes.0001_initial... OK
  Applying auth.0001_initial... OK
  Applying admin.0001_initial... OK
  Applying admin.0002_logentry_remove_auto_add... OK
  Applying admin.0003_logentry_add_action_flag_choices... OK
  Applying contenttypes.0002_remove_content_type_name... OK
  Applying auth.0002_alter_permission_name_max_length... OK
  Applying auth.0003_alter_user_email_max_length... OK
  Applying auth.0004_alter_user_username_opts... OK
  Applying auth.0005_alter_user_last_login_null... OK
  Applying auth.0006_require_contenttypes_0002... OK
  Applying auth.0007_alter_validators_add_error_messages... OK
  Applying auth.0008_alter_user_username_max_length... OK
  Applying auth.0009_alter_user_last_name_max_length... OK
  Applying auth.0010_alter_group_name_max_length... OK
  Applying auth.0011_update_proxy_permissions... OK
  Applying auth.0012_alter_user_first_name_max_length... OK
  Applying sessions.0001_initial... OK
↑SQLite 初期設定を行います。
(venv) [(一般ユーザ)@(ホスト名) mysite]$ python manage.py createsuperuser
Username (leave blank to use '(一般ユーザ)'): admindjango
Email address: (メールアドレス)
Password: (パスワード)
Password (again): (パスワード)
Superuser created successfully.
↑DBの管理者のユーザを作成します。
今回は、ユーザ名に「admindjango」を指定しています。
任意のユーザ名を入れます。
メールアドレスとパスワードも入れます。
サーバー起動
アプリケーションサーバーを起動させます。
(venv) [(一般ユーザ)@(ホスト名) mysite]$ python manage.py runserver
Watching for file changes with StatReloader
Performing system checks...

System check identified no issues (0 silenced).
XXXX XX, 2021 - 03:14:09
Django version 3.2.6, using settings 'mysite.settings'
Starting development server at http://127.0.0.1:8000/
Quit the server with CONTROL-C.
↑起動をしました。
「lynx」コマンドで、チェックをしてみます。
lynxコマンド
直接は、Djangoに関係ないですが、lynxコマンドのインストール履歴です。
lynxとは、sshでログインしながら、webにアクセスすることが出来ます。
簡単なチェックに利用出来ます。
[root@(ホスト名) ~]# dnf --enablerepo=PowerTools install lynx
Error: Unknown repo: 'PowerTools'
↑「PowerTools」というリポジトリはない・・・
[root@(ホスト名) ~]# dnf repolist all
repo id                                 repo name                                                                          status
appstream                               AlmaLinux 8 - AppStream                                                            enabled
(略)
powertools                              AlmaLinux 8 - PowerTools                                                           disabled
powertools-debuginfo                    AlmaLinux 8 - PowerTools debuginfo                                                 disabled
powertools-source                       AlmaLinux 8 - PowerTools Source                                                    disabled
↑AlmaLinuxでは、すべて小文字で、「powertools」が正しいようです
[root@(ホスト名) ~]# dnf --enablerepo=powertools install lynx
AlmaLinux 8 - PowerTools                                                                           2.7 MB/s | 2.2 MB     00:00

(略)

Installed:
  almalinux-indexhtml-8-7.el8.noarch                                    lynx-2.8.9-2.el8.x86_64

Complete!
↑lynxがインストールされました。
# lynx http://127.0.0.1:8000/
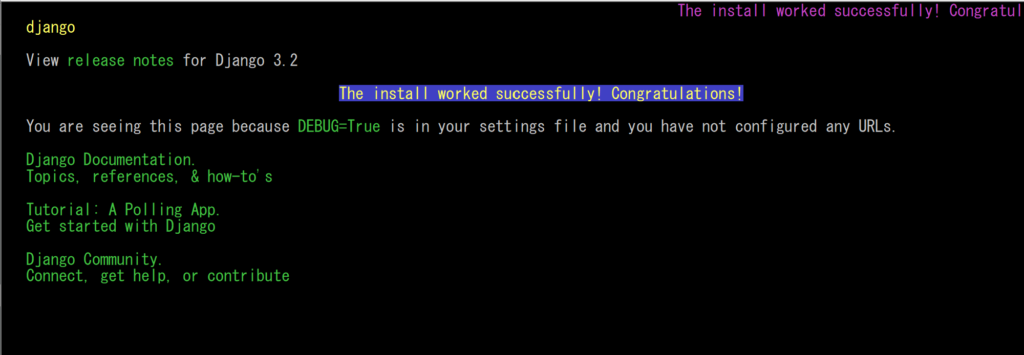
↑ 上記のような画面になります。
# lynx http://127.0.0.1:8000/admin/

↑管理画面も表示されました。
firewall変更
外部から閲覧するために、firewallを設定します。
[root@(ホスト名) ~]# cp /usr/lib/firewalld/services/http.xml /etc/firewalld/services/http-8000.xml
[root@(ホスト名) ~]# vi /etc/firewalld/services/http-8000.xml


 <port protocol="tcp" port="80"/>
  ↓
 <port protocol="tcp" port="8000"/>
↑ 8000ポート用のファイルを作成して、ファイルの中を変更します。
[root@(ホスト名) ~]# firewall-cmd --permanent --add-service=http-8000
success
[root@(ホスト名) ~]# firewall-cmd --reload
success
djangoの外部からの許可設定
(venv) [(一般ユーザ)@(ホスト名) mysite]$ vi mysite/settings.py

ALLOWED_HOSTS = []
 ↓
ALLOWED_HOSTS = ['*']
↑すべて許可
djangoの設定を、世界中どころからでも・・・、と、設定をします。
サーバー起動
(venv) [(一般ユーザ)@(ホスト名) mysite]$ python manage.py runserver 0.0.0.0:8000
Watching for file changes with StatReloader
Performing system checks...

System check identified no issues (0 silenced).
XXXX XX, 2021 - XX:XX:XX
Django version 3.2.6, using settings 'mysite.settings'
Starting development server at http://0.0.0.0:8000/
Quit the server with CONTROL-C.
↑外部から許可する場合は、上記のコマンドに「0.0.0.0:8000」を加えて起動します。
外部からのアクセス
http://(独自IPアドレス):8000/

↑上記のような画面が出てきます。
http://(独自IPアドレス):8000/admin/
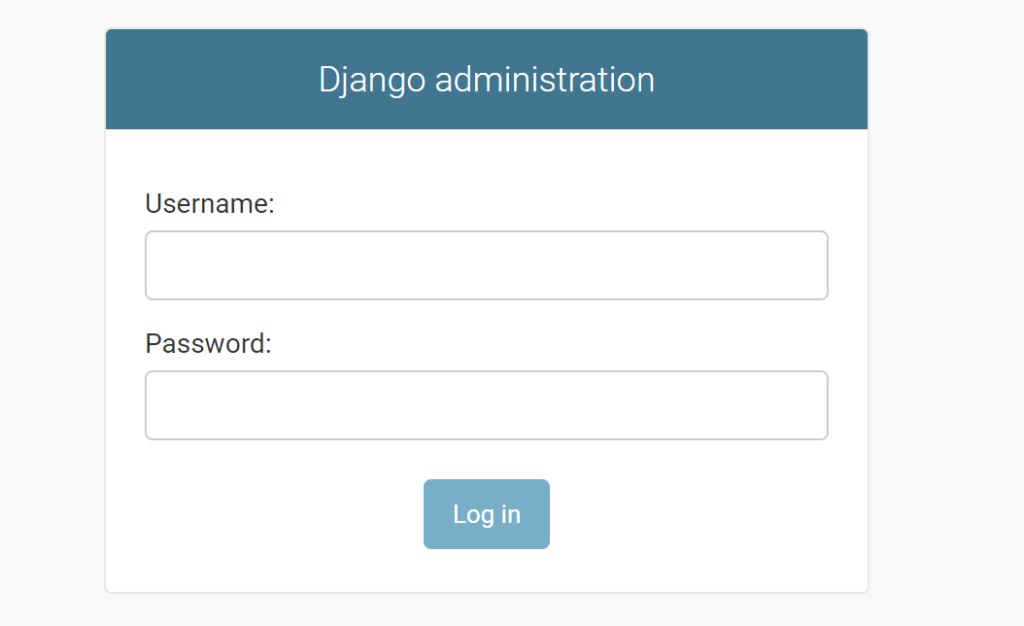
↑「/admin/」でアクセスをすると、上記のようになります。
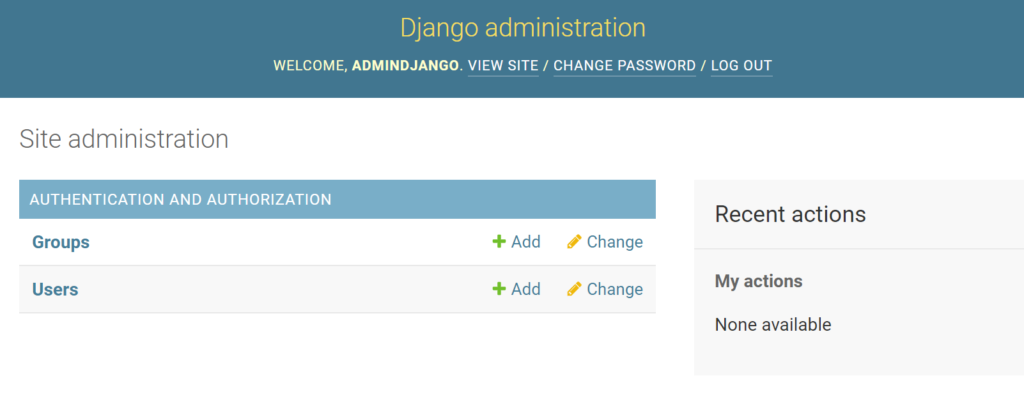
↑ 事前に設定した、スーパーユーザのID、パスワードで入ると上記のような画面になります。

