WEB上からPythonを動かすには、Pythonが稼働するAPサーバーが必要となります。
有名なものは
NGINX Unit
uWSGI
Gunicorn
でしょうか・・・
これらのソフトで、Pythonプログラムを動かします。
Python APサーバー、uWSGI
WEB上からPythonを動かすには、Pythonが稼働するAPサーバーが必要となります。有名なものはNGINX UnituWSGIGunicornでしょうか・・・これらのソフトで、Pythonプログラムを動かします。今回は、「uWSGI」...
↑「uWSGI」は、上記記事を

Python APサーバー、Gunicorn
WEB上からPythonを動かすには、Pythonが稼働するAPサーバーが必要となります。有名なものはNGINX UnituWSGIGunicornでしょうか・・・これらのソフトで、Pythonプログラムを動かします。# cat /etc/...
↑「Gunicorn」の設定方法です
# cat /etc/almalinux-release
AlmaLinux release 8.4 (Electric Cheetah)
今回、AlmaLinux 8.4 に、「Nginx Unit」をインストールをします。
Nginx Unitとは
Nginx Unitとは、Nginx/Nginx Plus に付帯して、もしくは、単独で動作することができる動的なアプリケーションです。
Go/Node.js/Perl/PHP/Python/Rubyを動かすことができます。
# yum install unit
# systemctl start unit
など、「unit」というサービス名が使われています。

F5 NGINX Products
Python
# python3 -V
Python 3.6.8
↑Python 3.6が入っています。
# dnf check-update
# dnf upgrade-minimal
# dnf groupinstall "Development Tools"
↑アップグレードと、ツール類のインストールします。
Nginx unit インストール
# vi /etc/yum.repos.d/unit.repo

[unit]
name=unit repo
baseurl=https://packages.nginx.org/unit/centos/$releasever/$basearch/
gpgcheck=0
enabled=1
↑参考サイト
NGINX Unit: Installation
[centos8]部分
# yum install unit
unit repo                                                                                           24 kB/s |  69 kB     00:02
Dependencies resolved.
===================================================================================================================================
 Package                    Architecture                 Version                                  Repository                  Size
===================================================================================================================================
Installing:
 unit                       x86_64                       1.25.0-1.el8.ngx                         unit                       343 k

(略)


Installed:
  unit-1.25.0-1.el8.ngx.x86_64

Complete!
# yum install unit-devel unit-python36
Last metadata expiration check: 0:01:33 ago on Sat 21 Aug 2021 01:04:03 PM JST.
Dependencies resolved.
===================================================================================================================================
 Package                           Architecture               Version                               Repository                Size
===================================================================================================================================
Installing:
 unit-devel                        x86_64                     1.25.0-1.el8.ngx                      unit                      85 k
 unit-python36                     x86_64                     1.25.0-1.el8.ngx                      unit                      92 k

(略)

Installed:
  unit-devel-1.25.0-1.el8.ngx.x86_64                             unit-python36-1.25.0-1.el8.ngx.x86_64

Complete!
# systemctl start unit
# systemctl status unit
● unit.service - NGINX Unit
   Loaded: loaded (/usr/lib/systemd/system/unit.service; disabled; vendor preset: disabled)
   Active: active (running) since Sat XXXX-XX-XX XX:XX:XX JST; 2s ago
 Main PID: 5362 (unitd)
    Tasks: 3 (limit: 11403)
   Memory: 1.6M
   CGroup: /system.slice/unit.service
           ├─5362 unit: main v1.25.0 [/usr/sbin/unitd --log /var/log/unit/unit.log --pid /var/run/unit/unit.pid --no-daemon]
           ├─5364 unit: controller
           └─5365 unit: router

systemd[1]: Started NGINX Unit.
unitd[5362]: XXXX/XX/XX XX:XX:XX [info] 5362#5362 unit started
# cd /etc/unit/
# vi config.json

{
  "listeners": {
    "*:8080": {
      "pass": "applications/python"
    }
  },

  "applications": {
    "python": {
      "type": "python",
      "path": "/var/www/html/",
      "module": "wsgi"
    }
  }
}
↑unitの設定ファイルです。新規に作成をします。
今回は、ポート「8080」で行ってみます。
「/var/www/html/」に、「wsgi.py」というファイルを置くという設定です。
Json構文でエラーになると、正しく動きません。
https://lab.syncer.jp/Tool/JSON-Viewer/
などの「JSON チェッカー」で、チェックをするといいかと思います。
# vi /var/www/html/wsgi.py

def application(environ, start_response):
    start_response("200 OK", [("Content-Type", "text/plain")])
    return (b"Hello World!")
↑あらかじめ、wsgi.pyのファイルを作っておきます。
作っておかないと、
{
        "error": "Failed to apply new configuration."
}
↑というエラーで返ってきます。
# curl -X PUT -d @/etc/unit/config.json --unix-socket /var/run/unit/control.sock http://localhost/config
{
        "success": "Reconfiguration done."
}
↑成功すると、上記のようなメッセージが返ってきます。
また、lynxコマンドで、チェックをすると
# lynx http://localhost:8080/
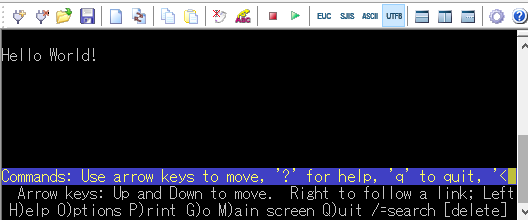
↑と、表示されます。
Nginx <-> Nginx Unit 連携
Nginx インストール
Nginx,PHP 7.4.19 (php-fpm),MySQL 8.0,Let's Encrypt,CentOS8 基本設定
CentOS8 でのNginx 1.20PHP 7.4.19MySQL 8.0.21Let's Encryptの基本設定を・・・CentOS8 基本設定# dnf check-update# dnf upgrade-minimal# dnf...
↑上記の記事を参考にしてください。
http {
    server {
        listen       80;
        server_name  localhost;

        location / {
            root   html;
            proxy_pass http://127.0.0.1:8080; ※
            index  index.html index.htm;
        }
    }
}
↑Nginx、設定の一部
※部分を追加します。
今回は、ポート(8080番)での例になります。

