CentOS8 での
Nginx 1.20
PHP 7.4.19
MySQL 8.0.21
Let’s Encrypt
の基本設定を・・・
CentOS8 基本設定
# dnf check-update
# dnf upgrade-minimal
# dnf upgrade
# dnf groupinstall "Development Tools"
↑インストールしているソフトのアップデートなどを行います。
MySQL 8.0インストール
# dnf info mysql-server.x86_64
Last metadata expiration check: 0:11:31 ago on Wed 19 May 2021 02:57:54 PM JST.
Available Packages
Name         : mysql-server
Version      : 8.0.21
Release      : 1.module_el8.4.0+589+11e12751
Architecture : x86_64
Size         : 22 M
Source       : mysql-8.0.21-1.module_el8.4.0+589+11e12751.src.rpm
Repository   : appstream
Summary      : The MySQL server and related files
URL          : http://www.mysql.com
License      : GPLv2 with exceptions and LGPLv2 and BSD
Description  : MySQL is a multi-user, multi-threaded SQL database server. MySQL is a
             : client/server implementation consisting of a server daemon (mysqld)
             : and many different client programs and libraries. This package contains
             : the MySQL server and some accompanying files and directories.
↑インストール可能な、MySQLのバージョンを確認します。
# dnf install mysql-server.x86_64
Last metadata expiration check: 0:12:03 ago on Wed 19 May 2021 02:57:54 PM JST.
Dependencies resolved.
============================================================================================================================================================================================
 Package                                              Architecture                   Version                                                        Repository                         Size
============================================================================================================================================================================================
Installing:
 mysql-server                                         x86_64                         8.0.21-1.module_el8.4.0+589+11e12751                           appstream                          22 M
Installing dependencies:
 mariadb-connector-c-config                           noarch                         3.1.11-2.el8_3                                                 appstream                          15 k
 mecab                                                x86_64                         0.996-1.module_el8.4.0+589+11e12751.9                          appstream                         393 k
 mysql                                                x86_64                         8.0.21-1.module_el8.4.0+589+11e12751                           appstream                          12 M
 mysql-common                                         x86_64                         8.0.21-1.module_el8.4.0+589+11e12751                           appstream                         148 k
 mysql-errmsg                                         x86_64                         8.0.21-1.module_el8.4.0+589+11e12751                           appstream                         581 k
 policycoreutils-python-utils                         noarch                         2.9-14.el8                                                     baseos                            252 k
 protobuf-lite                                        x86_64                         3.5.0-13.el8                                                   appstream                         149 k
Enabling module streams:
 mysql                                                                               8.0

Transaction Summary
============================================================================================================================================================================================
Install  8 Packages

Total download size: 36 M
Installed size: 182 M

(略)

Installed:
  mariadb-connector-c-config-3.1.11-2.el8_3.noarch              mecab-0.996-1.module_el8.4.0+589+11e12751.9.x86_64            mysql-8.0.21-1.module_el8.4.0+589+11e12751.x86_64
  mysql-common-8.0.21-1.module_el8.4.0+589+11e12751.x86_64      mysql-errmsg-8.0.21-1.module_el8.4.0+589+11e12751.x86_64      mysql-server-8.0.21-1.module_el8.4.0+589+11e12751.x86_64
  policycoreutils-python-utils-2.9-14.el8.noarch                protobuf-lite-3.5.0-13.el8.x86_64

Complete!
↑ MySQL 8.0がインストールできました。
# mysqld --version
/usr/libexec/mysqld  Ver 8.0.21 for Linux on x86_64 (Source distribution)
↑ インストールされた、MySQLのバージョンを確認します。
# systemctl start mysqld.service
# systemctl enable mysqld.service
Created symlink /etc/systemd/system/multi-user.target.wants/mysqld.service → /usr/lib/systemd/system/mysqld.service.
↑ MySQL を起動して、自動起動も設定をします。
MySQL 8.0 初期設定
# mysql_secure_installation

Securing the MySQL server deployment.

Connecting to MySQL using a blank password.

VALIDATE PASSWORD COMPONENT can be used to test passwords
and improve security. It checks the strength of password
and allows the users to set only those passwords which are
secure enough. Would you like to setup VALIDATE PASSWORD component?

Press y|Y for Yes, any other key for No: (そのままEnter)
Please set the password for root here.

New password:

Re-enter new password:
↑新しいパスワードを入れます。
By default, a MySQL installation has an anonymous user,
allowing anyone to log into MySQL without having to have
a user account created for them. This is intended only for
testing, and to make the installation go a bit smoother.
You should remove them before moving into a production
environment.

Remove anonymous users? (Press y|Y for Yes, any other key for No) : (そのままEnter)

 ... skipping.


Normally, root should only be allowed to connect from
'localhost'. This ensures that someone cannot guess at
the root password from the network.

Disallow root login remotely? (Press y|Y for Yes, any other key for No) : (そのままEnter)

 ... skipping.
By default, MySQL comes with a database named 'test' that
anyone can access. This is also intended only for testing,
and should be removed before moving into a production
environment.


Remove test database and access to it? (Press y|Y for Yes, any other key for No) :

 ... skipping.
Reloading the privilege tables will ensure that all changes
made so far will take effect immediately.

Reload privilege tables now? (Press y|Y for Yes, any other key for No) : (そのままEnter)

 ... skipping.
All done!
↑各種設定をします。
# mysql -u root -p
Enter password:
Welcome to the MySQL monitor.  Commands end with ; or \g.
Your MySQL connection id is 10
Server version: 8.0.21 Source distribution

Copyright (c) 2000, 2020, Oracle and/or its affiliates. All rights reserved.

Oracle is a registered trademark of Oracle Corporation and/or its
affiliates. Other names may be trademarks of their respective
owners.

Type 'help;' or '\h' for help. Type '\c' to clear the current input statement.

mysql> show databases;
+--------------------+
| Database           |
+--------------------+
| information_schema |
| mysql              |
| performance_schema |
| sys                |
+--------------------+
4 rows in set (0.01 sec)

mysql> show variables like 'character%';
+--------------------------+----------------------------+
| Variable_name            | Value                      |
+--------------------------+----------------------------+
| character_set_client     | utf8mb4                    |
| character_set_connection | utf8mb4                    |
| character_set_database   | utf8mb4                    |
| character_set_filesystem | binary                     |
| character_set_results    | utf8mb4                    |
| character_set_server     | utf8mb4                    |
| character_set_system     | utf8                       |
| character_sets_dir       | /usr/share/mysql/charsets/ |
+--------------------------+----------------------------+
8 rows in set (0.02 sec)
↑ログインをしてみて、日本語文字コードの初期設定を見てみます。
「utf8mb4」となっています。
PHP 7.4.xx インストール
# wget https://www.php.net/distributions/php-7.4.19.tar.gz
# tar xzvf php-7.4.19.tar.gz
# cd php-7.4.19/
↑ダウンロードをして解凍をします。
# dnf install libxml2-devel
# dnf install openssl-devel
# dnf install sqlite sqlite-devel
# dnf install libcurl-devel
# dnf install libpng-devel
# dnf install libwebp-devel
# dnf install libjpeg-devel
# dnf install libXpm-devel
# dnf install freetype-devel
# dnf install net-snmp net-snmp-devel
↑ 必要ライブラリをインストールします。
# dnf -y install "https://rpms.remirepo.net/enterprise/remi-release-8.rpm"
# dnf --enablerepo=remi -y install oniguruma-devel
↑鬼車をインストールします。
# wget https://github.com/unicode-org/icu/releases/download/release-64-2/icu4c-64_2-src.tgz
# tar xzvf icu4c-64_2-src.tgz
# cd icu/source/
# ./runConfigureICU Linux
# make
# make install
↑ 「icu4c」をインストールします。
# export PKG_CONFIG_PATH="/usr/local/lib/pkgconfig/"
↑ インストール用に環境変数を設定します。
# ./configure -with-mysqli --with-pdo-mysql --enable-mbstring --enable-pcntl --enable-fpm --with-fpm-user=nginx --with-fpm-group=nginx --enable-ftp --enable-gd --with-jpeg --with-webp --with-xpm --with-zlib --with-snmp --enable-sockets --with-freetype --enable-cgi --with-curl --enable-intl --with-gettext --with-openssl --enable-bcmath --enable-exif --with-pear

(略)

+--------------------------------------------------------------------+
| License:                                                           |
| This software is subject to the PHP License, available in this     |
| distribution in the file LICENSE. By continuing this installation  |
| process, you are bound by the terms of this license agreement.     |
| If you do not agree with the terms of this license, you must abort |
| the installation process at this point.                            |
+--------------------------------------------------------------------+

Thank you for using PHP.
↑ 「configure」を行います。
# make
# make install
↑ インストールします。
Nginx 1.20 インストール
# dnf install pcre-devel
# dnf install gd gd-devel
↑ 必要ライブラリをインストールします
# vi /etc/passwd
nginx:x:7003:7003::/home/nginx:/bin/nologin
# vi /etc/group
nginx:x:7003:
↑ ユーザとグループを設定します。
# wget http://nginx.org/download/nginx-1.20.0.tar.gz
# tar xzvf nginx-1.20.0.tar.gz

# ./configure --prefix=/usr/local/nginx --user=nginx --group=nginx --with-http_ssl_module --with-http_v2_module --with-http_gzip_static_module --with-http_image_filter_module --with-http_stub_status_module --with-http_realip_module --with-http_addition_module --with-http_sub_module

(略)

Configuration summary
  + using system PCRE library
  + using system OpenSSL library
  + using system zlib library

  nginx path prefix: "/usr/local/nginx"
  nginx binary file: "/usr/local/nginx/sbin/nginx"
  nginx modules path: "/usr/local/nginx/modules"
  nginx configuration prefix: "/usr/local/nginx/conf"
  nginx configuration file: "/usr/local/nginx/conf/nginx.conf"
  nginx pid file: "/usr/local/nginx/logs/nginx.pid"
  nginx error log file: "/usr/local/nginx/logs/error.log"
  nginx http access log file: "/usr/local/nginx/logs/access.log"
  nginx http client request body temporary files: "client_body_temp"
  nginx http proxy temporary files: "proxy_temp"
  nginx http fastcgi temporary files: "fastcgi_temp"
  nginx http uwsgi temporary files: "uwsgi_temp"
  nginx http scgi temporary files: "scgi_temp"
↑ Nginx をダウンロードして、configureを行います。
# make
# make install
↑ インストール完了しました
Nginx 設定 / 起動
# vi /usr/lib/systemd/system/nginx.service

[Unit]
Description=The nginx HTTP and reverse proxy server
After=network.target remote-fs.target nss-lookup.target
[Service]
Type=forking
PIDFile=/run/nginx.pid
# Nginx will fail to start if /run/nginx.pid already exists but has the wrong
# SELinux context. This might happen when running `nginx -t` from the cmdline.
# https://bugzilla.redhat.com/show_bug.cgi?id=1268621
ExecStartPre=/usr/bin/rm -f /run/nginx.pid
ExecStartPre=/usr/local/nginx/sbin/nginx -t
ExecStart=/usr/local/nginx/sbin/nginx -c /usr/local/nginx/conf/nginx.conf
ExecReload=/bin/kill -s HUP $MAINPID
KillSignal=SIGQUIT
TimeoutStopSec=5
KillMode=process
PrivateTmp=true
[Install]
WantedBy=multi-user.target
↑インストール用ファイルを用意します。
# systemctl start nginx

systemd[1]: nginx.service: Can't open PID file /run/nginx.pid (yet?) after start: No such file or directory
systemd[1]: nginx.service: start operation timed out. Terminating.
systemd[1]: nginx.service: Failed with result 'timeout'.
↑というエラーがでていたら、
# vi /usr/local/nginx/conf/nginx.conf

pid /run/nginx.pid;
↑ という行を加えます
/usr/lib/systemd/system/nginx.service
の
PIDFile=/run/nginx.pid
↑上記の設定内容とあわせます
# systemctl start nginx
# systemctl status nginx
● nginx.service - The nginx HTTP and reverse proxy server
   Loaded: loaded (/usr/lib/systemd/system/nginx.service; disabled; vendor preset: disabled)
   Active: active (running) since XXX 2021-XX-XX XX:XX:XX JST; 3min 25s ago
  Process: 16705 ExecStart=/usr/local/nginx/sbin/nginx -c /usr/local/nginx/conf/nginx.conf (code=exited, status=0/SUCCESS)
  Process: 16703 ExecStartPre=/usr/local/nginx/sbin/nginx -t (code=exited, status=0/SUCCESS)
  Process: 16701 ExecStartPre=/usr/bin/rm -f /run/nginx.pid (code=exited, status=0/SUCCESS)
 Main PID: 16706 (nginx)
    Tasks: 2 (limit: 11401)
   Memory: 4.4M
   CGroup: /system.slice/nginx.service
           ├─16706 nginx: master process /usr/local/nginx/sbin/nginx -c /usr/local/nginx/conf/nginx.conf
           └─16707 nginx: worker process

systemd[1]: Starting The nginx HTTP and reverse proxy server...
nginx[16703]: nginx: the configuration file /usr/local/nginx/conf/nginx.conf syntax is ok
nginx[16703]: nginx: configuration file /usr/local/nginx/conf/nginx.conf test is successful
systemd[1]: Started The nginx HTTP and reverse proxy server.
↑うまく起動をしました。
Firewall設定
# firewall-cmd --permanent --add-service=http
success
# firewall-cmd --permanent --add-service=https
success
# firewall-cmd --reload
success
# firewall-cmd --list-all
public (active)
  target: default
  icmp-block-inversion: no
  interfaces: eth0
  sources:
  services: cockpit dhcpv6-client http https ssh
  ports:
  protocols:
  forward: no
  masquerade: no
  forward-ports:
  source-ports:
  icmp-blocks:
  rich rules:
↑ http(80)とhttps(443) を開けます。
Let’s Encrypt
# yum install https://dl.fedoraproject.org/pub/epel/epel-release-latest-8.noarch.rpm
# yum install snapd

# systemctl enable --now snapd.socket
Created symlink /etc/systemd/system/sockets.target.wants/snapd.socket → /usr/lib/systemd/system/snapd.socket.

# snap install --classic certbot
2021-XX-XXTXX:XX:XX+09:00 INFO Waiting for automatic snapd restart...
Warning: /var/lib/snapd/snap/bin was not found in your $PATH. If you've not restarted your session
         since you installed snapd, try doing that. Please see https://forum.snapcraft.io/t/9469
         for more details.

certbot 1.15.0 from Certbot Project (certbot-eff?) installed
↑ インストールを行います。
# /var/lib/snapd/snap/bin/certbot certonly --webroot -w /usr/local/nginx/html/ -d (FQDN) --renew-by-default --email (メールアドレス)
Saving debug log to /var/log/letsencrypt/letsencrypt.log
Plugins selected: Authenticator webroot, Installer None

- - - - - - - - - - - - - - - - - - - - - - - - - - - - - - - - - - - - - - - -
Please read the Terms of Service at
https://letsencrypt.org/documents/LE-SA-v1.2-November-15-2017.pdf. You must
agree in order to register with the ACME server. Do you agree?
- - - - - - - - - - - - - - - - - - - - - - - - - - - - - - - - - - - - - - - -
(Y)es/(N)o: y

- - - - - - - - - - - - - - - - - - - - - - - - - - - - - - - - - - - - - - - -
Would you be willing, once your first certificate is successfully issued, to
share your email address with the Electronic Frontier Foundation, a founding
partner of the Let's Encrypt project and the non-profit organization that
develops Certbot? We'd like to send you email about our work encrypting the web,
EFF news, campaigns, and ways to support digital freedom.
- - - - - - - - - - - - - - - - - - - - - - - - - - - - - - - - - - - - - - - -
(Y)es/(N)o: Y
Account registered.
Requesting a certificate for (FQDN)
Performing the following challenges:
http-01 challenge for (FQDN)
Using the webroot path /usr/local/nginx/html for all unmatched domains.
Waiting for verification...
Cleaning up challenges
Subscribe to the EFF mailing list (email: (メールアドレス)).

IMPORTANT NOTES:
 - Congratulations! Your certificate and chain have been saved at:
   /etc/letsencrypt/live/(FQDN)/fullchain.pem
   Your key file has been saved at:
   /etc/letsencrypt/live/(FQDN)/privkey.pem
   Your certificate will expire on 2021-08-18. To obtain a new or
   tweaked version of this certificate in the future, simply run
   certbot again. To non-interactively renew *all* of your
   certificates, run "certbot renew"
 - If you like Certbot, please consider supporting our work by:

   Donating to ISRG / Let's Encrypt:   https://letsencrypt.org/donate
   Donating to EFF:                    https://eff.org/donate-le
↑ 今回の「FQDN」に対する、SSLを設定します。
Nginx、Let’s Encrypt 設定
# vi /usr/local/nginx/conf/nginx.conf

    # HTTPS server
    #
    #server {
    #    listen       443 ssl;
    #    server_name  localhost;

    #    ssl_certificate      cert.pem;
    #    ssl_certificate_key  cert.key;

    #    ssl_session_cache    shared:SSL:1m;
    #    ssl_session_timeout  5m;

    #    ssl_ciphers  HIGH:!aNULL:!MD5;
    #    ssl_prefer_server_ciphers  on;

    #    location / {
    #        root   html;
    #        index  index.html index.htm;
    #    }
    #}

 ↓

    # HTTPS server
    #
    server {
        listen       443 ssl;
        server_name  localhost;

        ssl_certificate      /etc/letsencrypt/live/(FQDN)/fullchain.pem;
        ssl_certificate_key  /etc/letsencrypt/live/(FQDN)/privkey.pem;

        ssl_session_cache    shared:SSL:1m;
        ssl_session_timeout  5m;

        ssl_ciphers  HIGH:!aNULL:!MD5;
        ssl_prefer_server_ciphers  on;

        location / {
            root   html;
            index  index.html index.htm;
        }
    }
↑ SSL部分を設定します。
ssl_certificate / ssl_certificate_key の部分を、前述で行った「certbot」コマンドでの結果を登録します。
# systemctl restart nginx
# systemctl status nginx
● nginx.service - The nginx HTTP and reverse proxy server
   Loaded: loaded (/usr/lib/systemd/system/nginx.service; disabled; vendor preset: disabled)
   Active: active (running) since Thu 2021-XX-XX XX:XX:XX JST; 6s ago
  Process: 2386 ExecStart=/usr/local/nginx/sbin/nginx -c /usr/local/nginx/conf/nginx.conf (code=exited, status=0/SUCCESS)
  Process: 2383 ExecStartPre=/usr/local/nginx/sbin/nginx -t (code=exited, status=0/SUCCESS)
  Process: 2380 ExecStartPre=/usr/bin/rm -f /run/nginx.pid (code=exited, status=0/SUCCESS)
 Main PID: 2387 (nginx)
    Tasks: 2 (limit: 11401)
   Memory: 2.3M
   CGroup: /system.slice/nginx.service
           ├─2387 nginx: master process /usr/local/nginx/sbin/nginx -c /usr/local/nginx/conf/nginx.conf
           └─2388 nginx: worker process

systemd[1]: Starting The nginx HTTP and reverse proxy server...
nginx[2383]: nginx: the configuration file /usr/local/nginx/conf/nginx.conf syntax is ok
nginx[2383]: nginx: configuration file /usr/local/nginx/conf/nginx.conf test is successful
systemd[1]: Started The nginx HTTP and reverse proxy server.

# netstat -an |grep :443
tcp        0      0 0.0.0.0:443             0.0.0.0:*               LISTEN
↑ nginxがうまく起動をしました
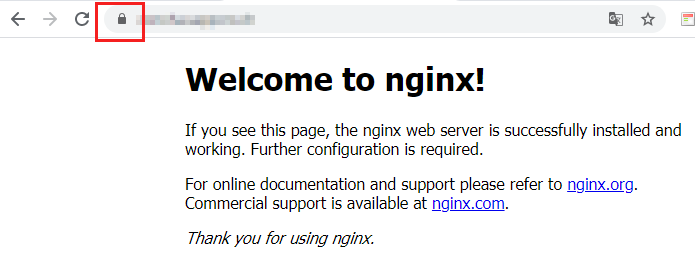
↑SSLも大丈夫です
PHP FPM/FastCGIの設定
# cd /usr/local/etc/
# cp php-fpm.conf.default php-fpm.conf
# vi php-fpm.conf
;pid = run/php-fpm.pid
 ↓
pid = /var/run/php-fpm.pid
;error_log = log/php-fpm.log
 ↓
error_log = /var/log/php-fpm.log
include=NONE/etc/php-fpm.d/*.conf
 ↓
include=/usr/local/etc/php-fpm.d/*.conf
# cd /usr/local/etc/
# cd php-fpm.d/
# cp www.conf.default www.conf
↑ FPM/FastCGIの設定を行います。
# cp sapi/fpm/php-fpm.service /etc/systemd/system/php-fpm.service
# vi /etc/systemd/system/php-fpm.service
ProtectKernelModules=true
 ↓
#ProtectKernelModules=true
ProtectKernelTunables=true
 ↓
#ProtectKernelTunables=true
ProtectControlGroups=true
 ↓
#ProtectControlGroups=true
RestrictRealtime=true
 ↓
#RestrictRealtime=true
RestrictNamespaces=true
 ↓
#RestrictNamespaces=true
↑スタートアップの設定
# systemctl start php-fpm
# systemctl status php-fpm
● php-fpm.service - The PHP FastCGI Process Manager
   Loaded: loaded (/etc/systemd/system/php-fpm.service; disabled; vendor preset: disabled)
   Active: active (running) since Thu 2021-XX-XX XX:XX:XX JST; 3s ago
 Main PID: 2466 (php-fpm)
    Tasks: 3 (limit: 11401)
   Memory: 9.0M
   CGroup: /system.slice/php-fpm.service
           ├─2466 php-fpm: master process (/usr/local/etc/php-fpm.conf)
           ├─2467 php-fpm: pool www
           └─2468 php-fpm: pool www

systemd[1]: Started The PHP FastCGI Process Manager.
↑うまく起動をしました
php のための Nginx 設定(基本)
vi /usr/local/nginx/conf/nginx.conf

location / {
    root   html;
    index  index.html index.htm;

}

    ↓

location / {
    root   html;
    index  index.html index.htm;
        location ~ \.php$ {
            fastcgi_pass   127.0.0.1:9000;
            fastcgi_index  index.php;
            fastcgi_param  SCRIPT_FILENAME  $request_filename;
            include        fastcgi_params;
        }

}
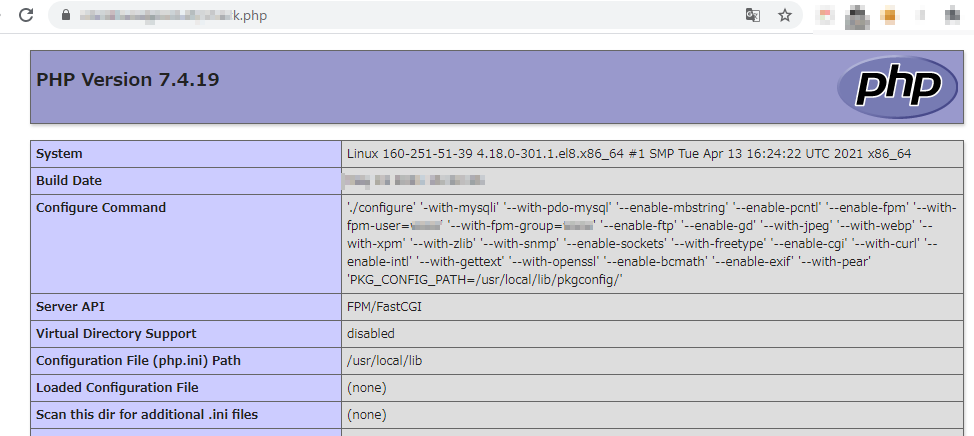
↑ phpがうまく処理されました。

