「広告」

ワードプレス、ContactForm7の内容を、LineWorksに

「広告」
記事内に広告が含まれています。
「広告」

現場では、「LineWorks」が使われている場合があります。
わざわざメールをチェックしなくても、「LineWorks」に通知されると便利です。
今回は、ContactForm7 + phpプログラムでやってみたいと思います。

ワードプレス、ContactForm7の内容を、LineWorksに。API2.0版
ワードプレスの「お問い合わせ」内容を、LineWorksのトークルームで受信をして、複数人で共有するという方法です。ワードプレスの「ContactForm7」+「phpプログラム」で実現しています。LineWorks API 2.0 版です...

↑ API 2.0 版です(2023/06/30)

「広告」

「LineWorks」とは

「LINE WORKS」は、情報や予定を共有しあって活動する、組織・チームのためのコミュニケーションツール。(下記のページから引用)
https://line.worksmobile.com/jp/blog/product/line-works/

LINEのアカウントは必要ありません。
LINEのアカウントとは、区別されます。

実際に現場で使っている組織も多いのでしょう。

「広告」

LineWorks Developers 基本設定


↑右上の「ログイン」を選びます。

↑LineWorksと、ワードプレスをつなぐには、「Developers」に、「LineWorks」の管理者でログインをします。

↑「Developer Console」を選びます。
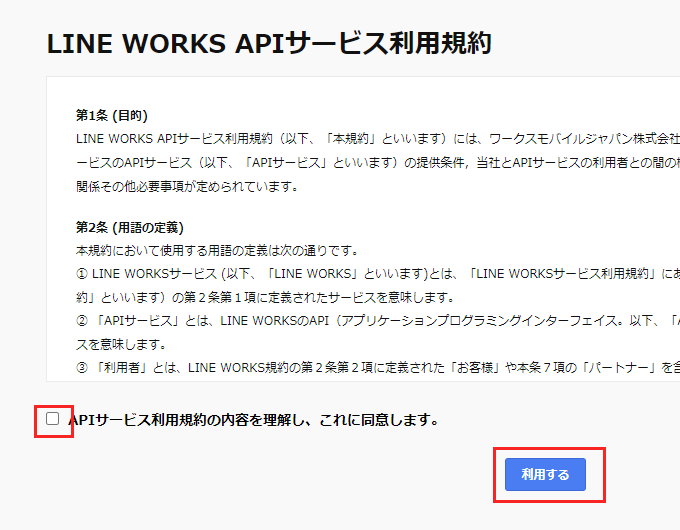

↑規約を読み、チェックをして、「利用する」を押して進みます。
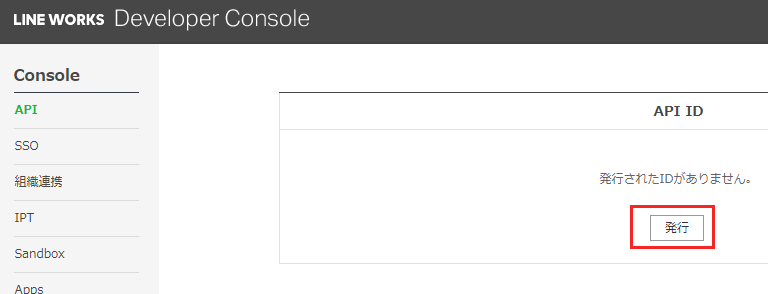

↑このような画面が出てきます。
「API ID」を発行します。
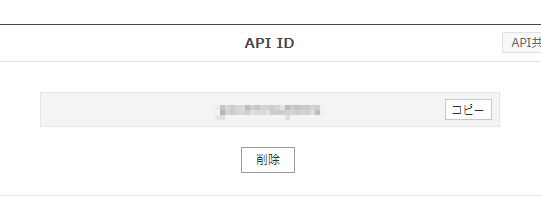

↑上記のように「英数字」が表示されて、「API ID」が発行されました。

「広告」

送信準備-LineWorks Developer Consoleなどでの設定

送信する前に、「ラインワークス」の「Developer Console」や管理者画面で、設定を行います。

Server API Consumer Keyの発行
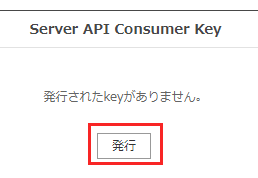

↑「Server API Consumer Key」を作成します。「発行」を押します。
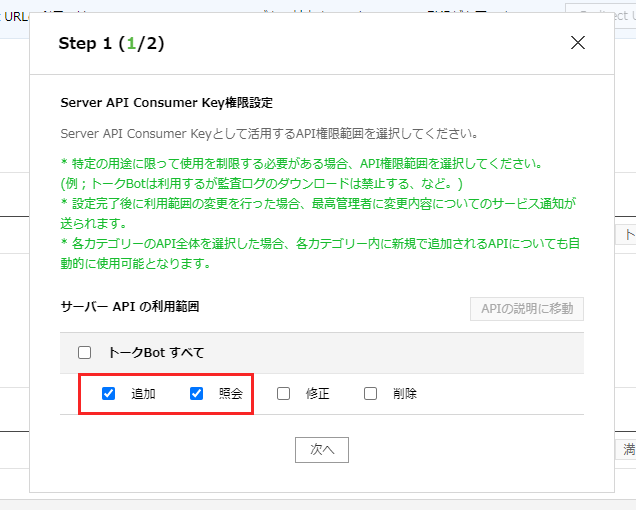

↑「追加」「照会」のみを選びます
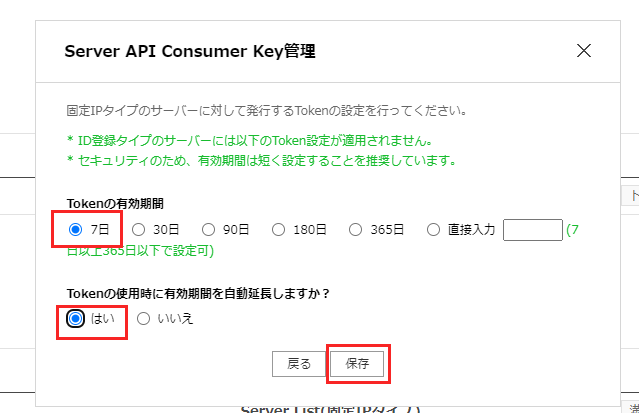

↑7日間、で、自動更新とします。


↑上記のような感じになりました。

botの追加

LineWorks のDeveloper Console上で、「bot」のサービスを追加します。
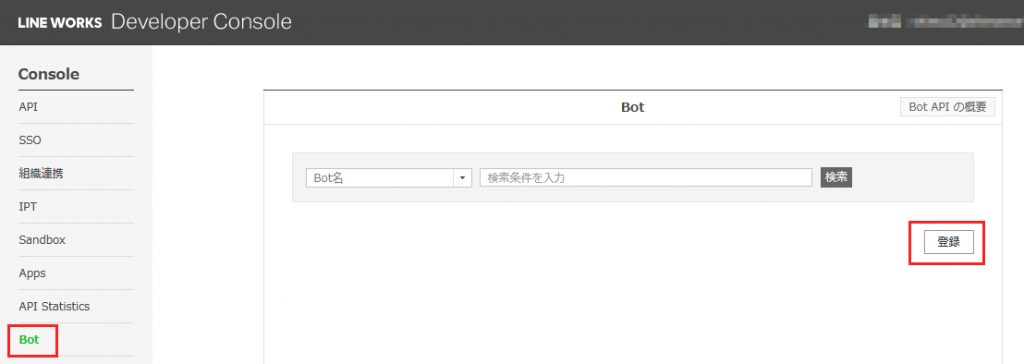

↑「登録」を押します。
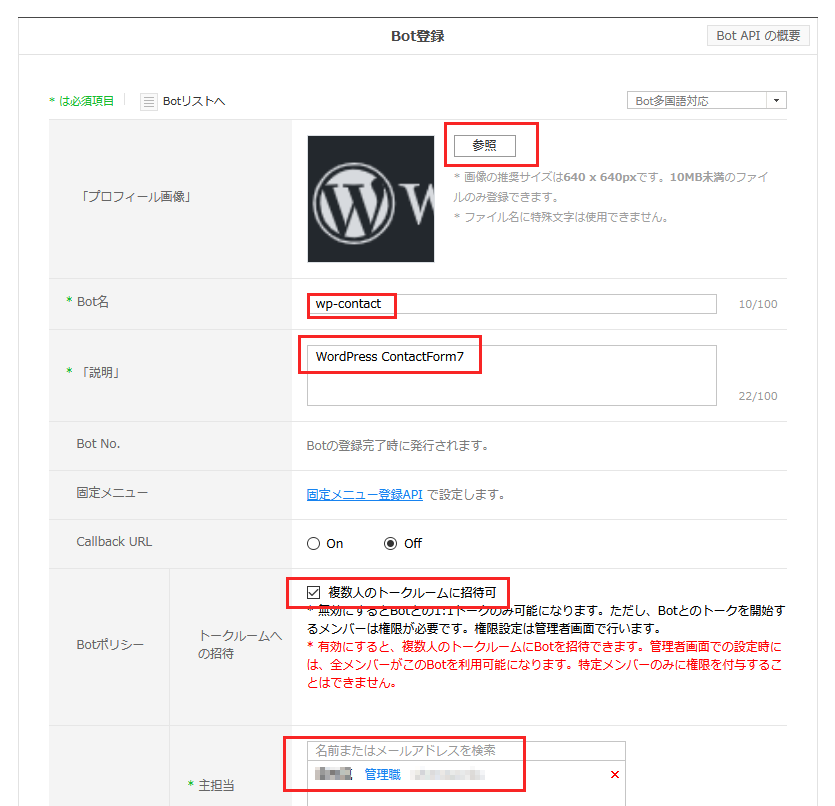

↑「bot登録」の画面になります。
プロフィール画像は、linework上に表示されますので、わかりやすい画像にすると混乱が少ないです。
今回、ワードプレスのロゴを入れてみました。

「bot名」も、lineworks上に表示されますので、わかりやすい名称がいいかと思います。
「説明」は、ご自身の説明を入れます。
「複数人のトークルーム招待可」にチェックを入れます。
「主担当」は、ログインしている管理者を、設定するといいかと思います。
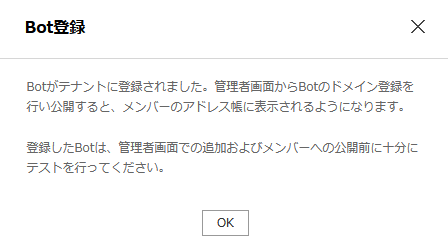

↑登録を行うと上記のような画面が出てきます。
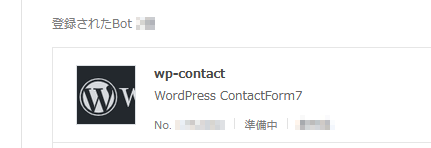

↑登録された「bot」は、まだ「準備中」となっています。

linework上から、botの追加

lineworksの管理者でログインを行います。(Developer Consoleではないです)
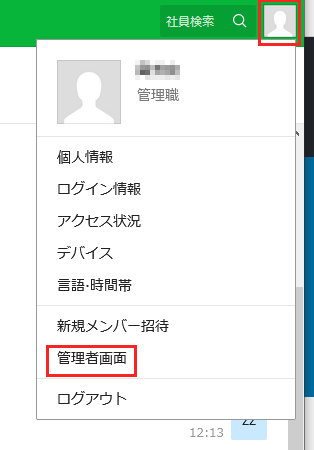

↑管理者のlineworks上の「管理画面」を選びます。
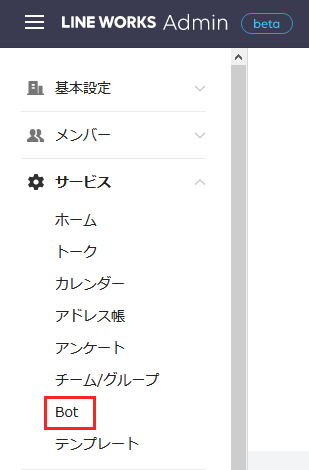

↑「サービス」の「bot」を選びます。


↑右上の「bot追加」を選びます。
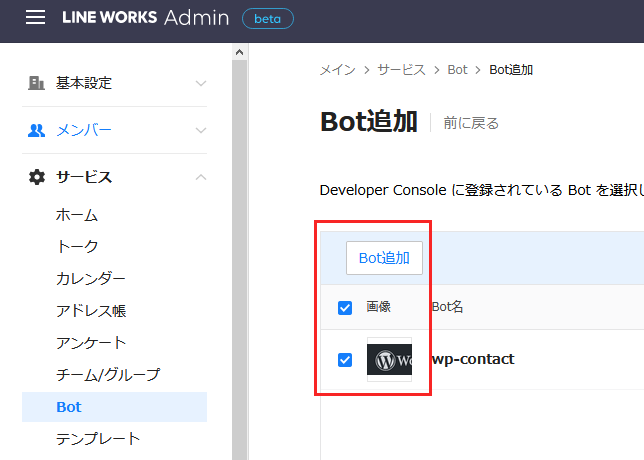

↑先ほど、登録した、botが表示されているはずです。

チェックをして、「bot追加」を押します。
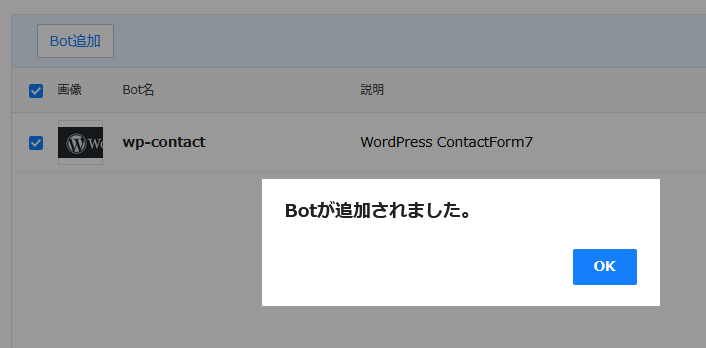

↑「botが追加されました。」とメッセージが出てくると思います。
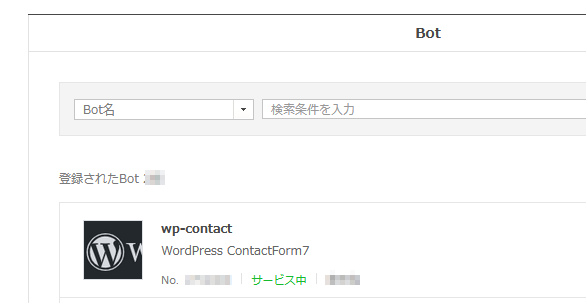

↑「developer tool」のほうでは、「サービス中」に変更されたかと思います。
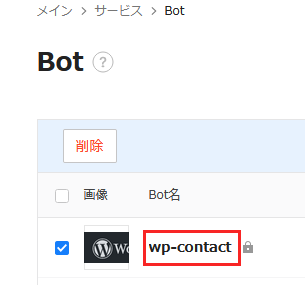

↑公開されていなく、公開をして利用したいので、先ほどの「bot名」をクリックします。
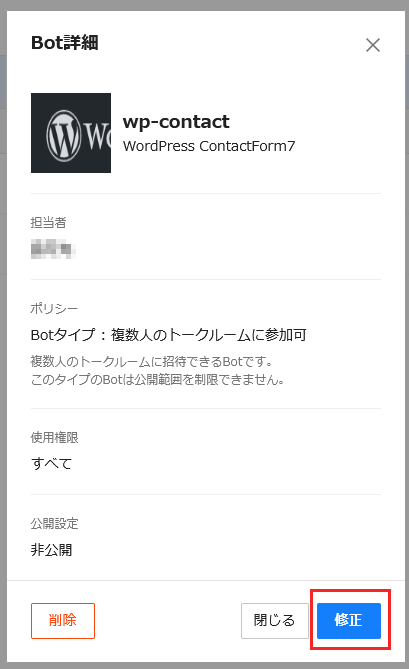

↑修正を押します。
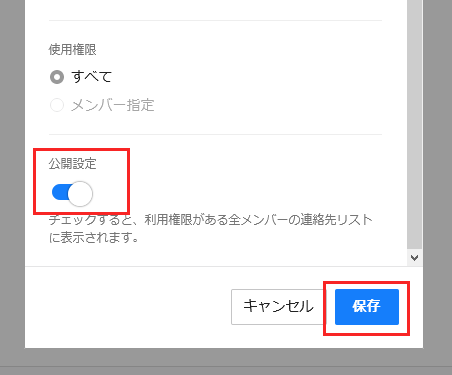

↑画面下の「公開設定」をONにして、「保存」を押します。
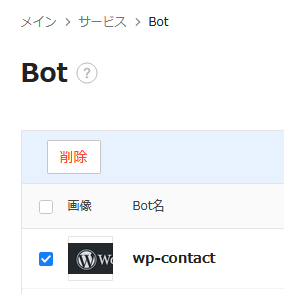

↑「鍵」のマークが無くなりました。
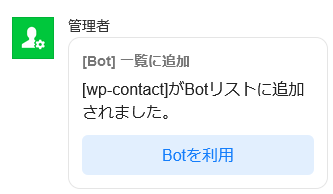

↑管理者への通知で、「botが追加された」と表示されました。

トークルームへの招待

特定の人が、ワードプレスのメッセージを受け取る場合より、トークルームで複数の人がメッセージを見る方が現実的でしょう。

トークルームへ、botの招待を行います。


↑トークルームを選んで、右上の「・・・」を選び、「招待」を押します。
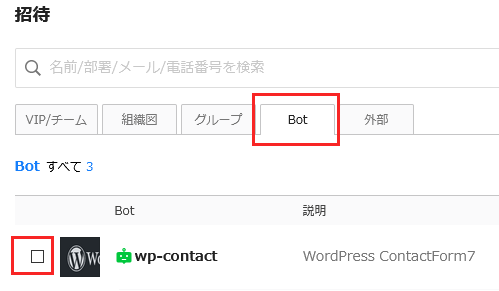

↑「bot」タグを選びます。
先ほど、登録した、botを選びます。


↑トークルームに1名分加わりました(ワードプレスのアイコンが加わりました)。

Guzzle Http インストール

lineworksとの通信で、Guzzle Httpを使ってみます。
前までは、curlとかを使っていましたが・・・

Plain text
Copy to clipboard
Open code in new window
EnlighterJS 3 Syntax Highlighter
# php -r "copy('https://getcomposer.org/installer', 'composer-setup.php');"

↑で、「composer-setup.php」をゲット

Plain text
Copy to clipboard
Open code in new window
EnlighterJS 3 Syntax Highlighter
$ php composer-setup.php
All settings correct for using Composer
Downloading...
Composer (version 2.0.8) successfully installed to: /home/white_set/web/line2/composer.phar
$ php composer-setup.php All settings correct for using Composer Downloading... Composer (version 2.0.8) successfully installed to: /home/white_set/web/line2/composer.phar
$ php composer-setup.php 
All settings correct for using Composer
Downloading...

Composer (version 2.0.8) successfully installed to: /home/white_set/web/line2/composer.phar

↑composer.pharをゲットします。

Plain text
Copy to clipboard
Open code in new window
EnlighterJS 3 Syntax Highlighter
$ php ./composer.phar require guzzlehttp/guzzle
Using version ^7.2 for guzzlehttp/guzzle
./composer.json has been created
Running composer update guzzlehttp/guzzle
Loading composer repositories with package information
Updating dependencies
Lock file operations: 6 installs, 0 updates, 0 removals
- Locking guzzlehttp/guzzle (7.2.0)
- Locking guzzlehttp/promises (1.4.0)
- Locking guzzlehttp/psr7 (1.7.0)
- Locking psr/http-client (1.0.1)
- Locking psr/http-message (1.0.1)
- Locking ralouphie/getallheaders (3.0.3)
Writing lock file
Installing dependencies from lock file (including require-dev)
Package operations: 6 installs, 0 updates, 0 removals
- Installing psr/http-message (1.0.1): Extracting archive
- Installing psr/http-client (1.0.1): Extracting archive
- Installing ralouphie/getallheaders (3.0.3): Extracting archive
- Installing guzzlehttp/psr7 (1.7.0): Extracting archive
- Installing guzzlehttp/promises (1.4.0): Extracting archive
- Installing guzzlehttp/guzzle (7.2.0): Extracting archive
2 package suggestions were added by new dependencies, use `composer suggest` to see details.
Generating autoload files
1 package you are using is looking for funding.
Use the `composer fund` command to find out more!
$ php ./composer.phar require guzzlehttp/guzzle Using version ^7.2 for guzzlehttp/guzzle ./composer.json has been created Running composer update guzzlehttp/guzzle Loading composer repositories with package information Updating dependencies Lock file operations: 6 installs, 0 updates, 0 removals - Locking guzzlehttp/guzzle (7.2.0) - Locking guzzlehttp/promises (1.4.0) - Locking guzzlehttp/psr7 (1.7.0) - Locking psr/http-client (1.0.1) - Locking psr/http-message (1.0.1) - Locking ralouphie/getallheaders (3.0.3) Writing lock file Installing dependencies from lock file (including require-dev) Package operations: 6 installs, 0 updates, 0 removals - Installing psr/http-message (1.0.1): Extracting archive - Installing psr/http-client (1.0.1): Extracting archive - Installing ralouphie/getallheaders (3.0.3): Extracting archive - Installing guzzlehttp/psr7 (1.7.0): Extracting archive - Installing guzzlehttp/promises (1.4.0): Extracting archive - Installing guzzlehttp/guzzle (7.2.0): Extracting archive 2 package suggestions were added by new dependencies, use `composer suggest` to see details. Generating autoload files 1 package you are using is looking for funding. Use the `composer fund` command to find out more!
$ php ./composer.phar require guzzlehttp/guzzle
Using version ^7.2 for guzzlehttp/guzzle
./composer.json has been created
Running composer update guzzlehttp/guzzle
Loading composer repositories with package information
Updating dependencies
Lock file operations: 6 installs, 0 updates, 0 removals
  - Locking guzzlehttp/guzzle (7.2.0)
  - Locking guzzlehttp/promises (1.4.0)
  - Locking guzzlehttp/psr7 (1.7.0)
  - Locking psr/http-client (1.0.1)
  - Locking psr/http-message (1.0.1)
  - Locking ralouphie/getallheaders (3.0.3)
Writing lock file
Installing dependencies from lock file (including require-dev)
Package operations: 6 installs, 0 updates, 0 removals
  - Installing psr/http-message (1.0.1): Extracting archive
  - Installing psr/http-client (1.0.1): Extracting archive
  - Installing ralouphie/getallheaders (3.0.3): Extracting archive
  - Installing guzzlehttp/psr7 (1.7.0): Extracting archive
  - Installing guzzlehttp/promises (1.4.0): Extracting archive
  - Installing guzzlehttp/guzzle (7.2.0): Extracting archive
2 package suggestions were added by new dependencies, use `composer suggest` to see details.
Generating autoload files
1 package you are using is looking for funding.
Use the `composer fund` command to find out more!

↑「composer.phar」を実行します。
「vendor」というフォルダができます。

Plain text
Copy to clipboard
Open code in new window
EnlighterJS 3 Syntax Highlighter
require_once '/xxxx/vendor/autoload.php';
use GuzzleHttp\Client;
require_once '/xxxx/vendor/autoload.php'; use GuzzleHttp\Client;
require_once '/xxxx/vendor/autoload.php';
use GuzzleHttp\Client;

↑PHPプログラム上では、上記のように利用します。

「広告」

Server List(固定IPタイプ)でのメッセージ送信

Server List(固定IPタイプ)で、lineworks側に通知してみます。

このタイプは、有効期限がありますので、ご留意ください。

事前準備-Developer consoleで、Tokenの取得

メッセージを送るタイプで、2つあります。「固定IPタイプ」と「ID登録タイプ」です。
まずは、前者の「固定IPタイプ」を設定します。


↑追加を押します。
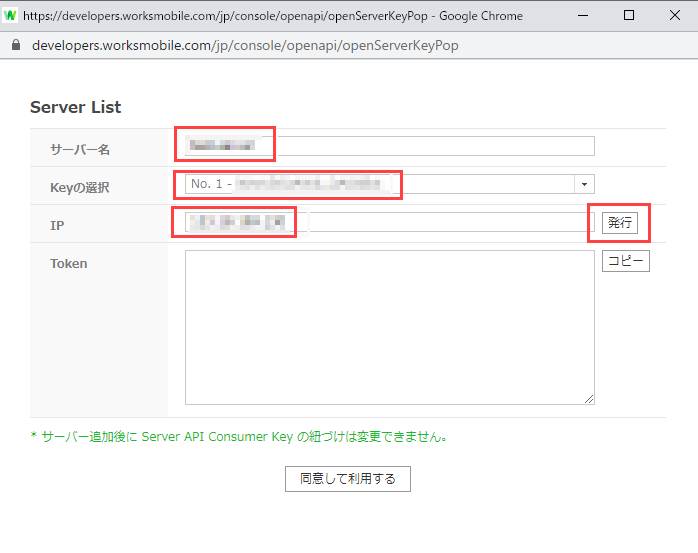

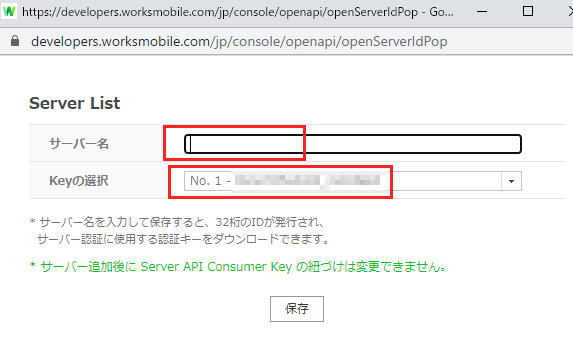
↑小窓が出てくるので、「サーバー名」のところは、わかりやすい名称を入れます。
「keyの選択」は、先ほどの「Server API Consumer Key」が選択されているかと思います。
「IP」は、サーバーの固定IPを入れます。
そして「発行」を押します。
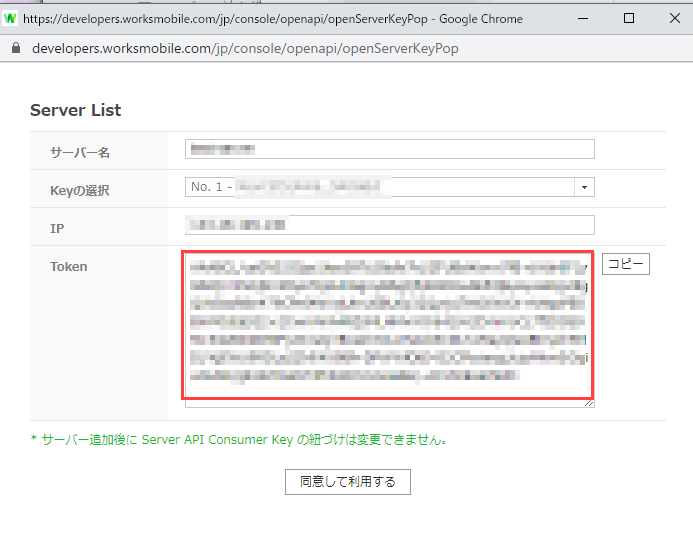
(52)

↑「token」のところに、長い英数字が入りました。

「同意して利用する」を押します。


↑このような画面になります。

Server List(固定IPタイプ)-サンプルプログラム


Plain text
Copy to clipboard
Open code in new window
EnlighterJS 3 Syntax Highlighter
<?php
require_once '/xxxxx/vendor/autoload.php';
use GuzzleHttp\Client;
$api_id = '(API ID)';
send_mes();
function send_mes(){
global $api_id;
$message = "(lineworksに通知したいメッセージ)";
$botno = '(botno)';
$consumerKey = '(consumerKey)';
$accountid = '(個人のlineworksアカウント)'; # xxxx@xxxx 形式
#$roomid = '(roomID)';
$token_now = '(トークン)';
$url = "https://apis.worksmobile.com/r/$api_id/message/v1/bot/$botno/message/push";
$options = [
'json' => [
"accountId" => $accountid,
#"roomId" => $roomid,
"content" => [
"type" => "text",
"text" => $message
]
],
'headers' => [
'Content-Type' => 'application/json;charset=UTF-8',
'consumerKey' => $consumerKey,
'Authorization' => "Bearer $token_now"
]
];
$client = new Client();
$response = $client->request("POST", $url, $options);
}
?>
<?php require_once '/xxxxx/vendor/autoload.php'; use GuzzleHttp\Client; $api_id = '(API ID)'; send_mes(); function send_mes(){ global $api_id; $message = "(lineworksに通知したいメッセージ)"; $botno = '(botno)'; $consumerKey = '(consumerKey)'; $accountid = '(個人のlineworksアカウント)'; # xxxx@xxxx 形式 #$roomid = '(roomID)'; $token_now = '(トークン)'; $url = "https://apis.worksmobile.com/r/$api_id/message/v1/bot/$botno/message/push"; $options = [ 'json' => [ "accountId" => $accountid, #"roomId" => $roomid, "content" => [ "type" => "text", "text" => $message ] ], 'headers' => [ 'Content-Type' => 'application/json;charset=UTF-8', 'consumerKey' => $consumerKey, 'Authorization' => "Bearer $token_now" ] ]; $client = new Client(); $response = $client->request("POST", $url, $options); } ?>
<?php

    require_once '/xxxxx/vendor/autoload.php';
    use GuzzleHttp\Client;


    $api_id = '(API ID)';

    send_mes();

    function send_mes(){

            global $api_id;

            $message = "(lineworksに通知したいメッセージ)";

            $botno = '(botno)';
            $consumerKey = '(consumerKey)';
            $accountid = '(個人のlineworksアカウント)'; # xxxx@xxxx 形式
            #$roomid = '(roomID)';
            $token_now = '(トークン)';
            $url = "https://apis.worksmobile.com/r/$api_id/message/v1/bot/$botno/message/push";
            $options = [
                'json' => [
                    "accountId" => $accountid,
                    #"roomId" => $roomid,
                    "content" => [
                        "type" => "text",
                        "text" => $message
                    ]
                ],
                'headers' => [
                    'Content-Type' => 'application/json;charset=UTF-8',
                    'consumerKey' => $consumerKey,
                    'Authorization' => "Bearer $token_now"
                ]
            ];
            $client = new Client();
            $response = $client->request("POST", $url, $options);
    }


?>

↑「()」には、「Develovper Console」などで、取得した英数字を入れてください。
そして、上記のPHPを実行すると、個人のトークルームにメッセージが送信されるはずです。

「トークルーム」へ通知する方法(ルームIDを知る方法)

「トークルーム」への通知は、「トークルームのID」を知らないといけません。
このIDは管理画面からは、確認することができません。

ここでは、「callbackのURL」から解析してみいたと思います。
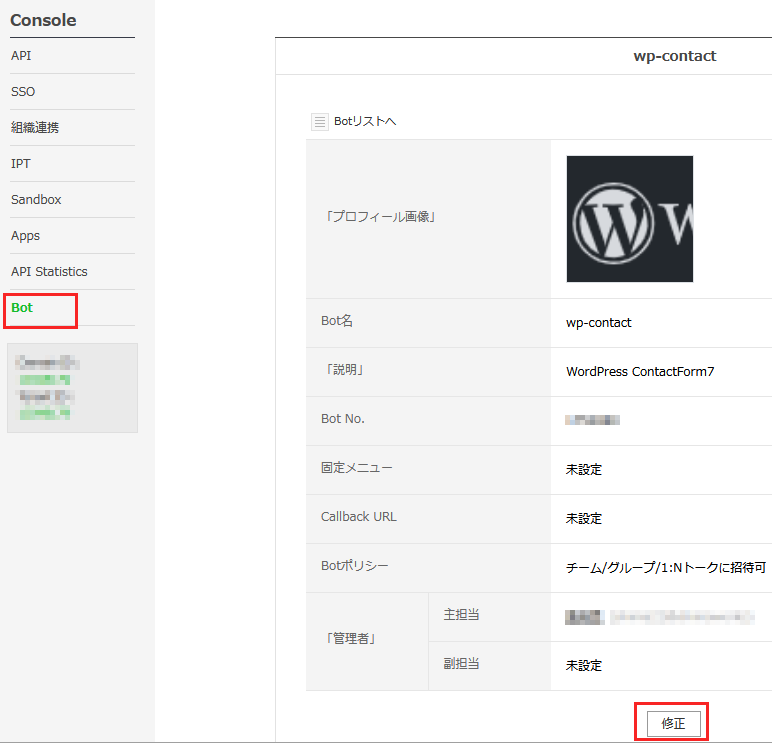

↑developer consoleの「bot」から作成済みの「bot」で、「修正」を選びます。


↑プログラムを設置できそうなURLを入れます。「テキスト」を選択します。
ContactForm7設置サーバー以外でもいいです。

Plain text
Copy to clipboard
Open code in new window
EnlighterJS 3 Syntax Highlighter
$jsoninput = file_get_contents('php://input');
$jsonobj = json_decode($jsoninput);
$roomid = $jsonobj->{"source"}->{"roomId"};
$jsoninput = file_get_contents('php://input'); $jsonobj = json_decode($jsoninput); $roomid = $jsonobj->{"source"}->{"roomId"};
$jsoninput = file_get_contents('php://input');
$jsonobj = json_decode($jsoninput);
$roomid = $jsonobj->{"source"}->{"roomId"};

↑上記のようなphpプログラムをcallbackプログラムに設置します。対象のトークルームにメッセージが投稿されると、calbackのURLが自動的にアクセスされて、プログラム実行されます。そして、上記の「$roomid」の変数にroomID(数字)が書かれています。

Plain text
Copy to clipboard
Open code in new window
EnlighterJS 3 Syntax Highlighter
function send_mes(){
global $api_id;
$message = "(lineworksに通知したいメッセージ)";
$botno = '(botno)';
$consumerKey = '(consumerKey)';
#$accountid = '(個人のlineworksアカウント)'; # xxxx@xxxx 形式
$roomid = '(roomID)';
$token_now = '(トークン)';
$url = "https://apis.worksmobile.com/r/$api_id/message/v1/bot/$botno/message/push";
$options = [
'json' => [
#"accountId" => $accountid,
"roomId" => $roomid,
"content" => [
"type" => "text",
"text" => $message
]
],
'headers' => [
'Content-Type' => 'application/json;charset=UTF-8',
'consumerKey' => $consumerKey,
'Authorization' => "Bearer $token_now"
]
];
$client = new Client();
$response = $client->request("POST", $url, $options);
}
function send_mes(){ global $api_id; $message = "(lineworksに通知したいメッセージ)"; $botno = '(botno)'; $consumerKey = '(consumerKey)'; #$accountid = '(個人のlineworksアカウント)'; # xxxx@xxxx 形式 $roomid = '(roomID)'; $token_now = '(トークン)'; $url = "https://apis.worksmobile.com/r/$api_id/message/v1/bot/$botno/message/push"; $options = [ 'json' => [ #"accountId" => $accountid, "roomId" => $roomid, "content" => [ "type" => "text", "text" => $message ] ], 'headers' => [ 'Content-Type' => 'application/json;charset=UTF-8', 'consumerKey' => $consumerKey, 'Authorization' => "Bearer $token_now" ] ]; $client = new Client(); $response = $client->request("POST", $url, $options); }
function send_mes(){

        global $api_id;

        $message = "(lineworksに通知したいメッセージ)";

        $botno = '(botno)';
        $consumerKey = '(consumerKey)';
        #$accountid = '(個人のlineworksアカウント)'; # xxxx@xxxx 形式
        $roomid = '(roomID)';
        $token_now = '(トークン)';
        $url = "https://apis.worksmobile.com/r/$api_id/message/v1/bot/$botno/message/push";
        $options = [
            'json' => [
                #"accountId" => $accountid,
                "roomId" => $roomid,
                "content" => [
                    "type" => "text",
                    "text" => $message
                ]
            ],
            'headers' => [
                'Content-Type' => 'application/json;charset=UTF-8',
                'consumerKey' => $consumerKey,
                'Authorization' => "Bearer $token_now"
            ]
        ];
        $client = new Client();
        $response = $client->request("POST", $url, $options);
}

↑上記の「$roomid」のところに、callbackで得られた数字を入れて、「roomID =>」のところを有効にします。

これで、特定のトークルームに発言が届く事になります。

「広告」

Server List(ID登録タイプ)でのメッセージ送信

こちらの方法では、決まった手順に従い、毎回、tokenを取得します。
手順が面倒かもしれません。

事前準備-Developer consoleで、ID・認証キーの取得

↑追加を押します。


↑「サーバー名」のところは、わかりやすい名称を入れます。
「keyの選択」部分は、同じ画面の「Server API Consumer Key」で設定したkeyを選びます。
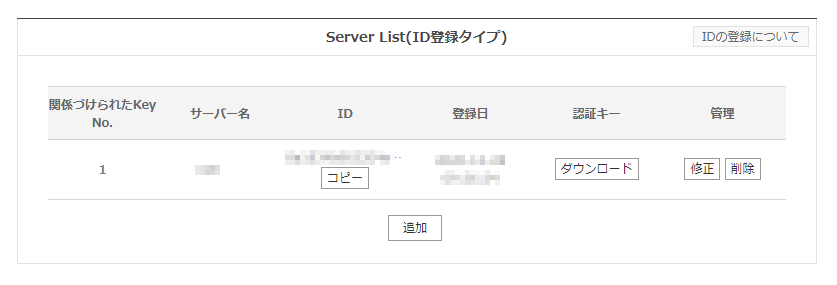

↑上記のような画面になります。

ここで、「ID」のところを数字と、
「認証キー」のボタンを押して得られるテキストデータを、プログラムで利用します。
「認証キー」は重要で、きちんと保管をしておきましょう。

事前準備-JWTライブラリの設置

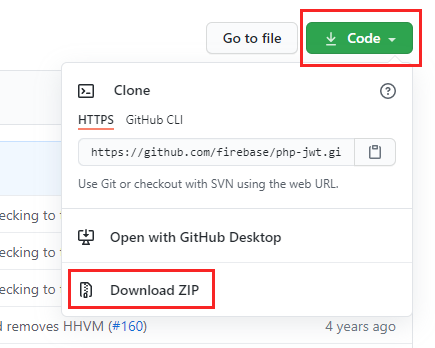
JWT(JSON Web Token RFC-7519) を利用するため、phpで、利用できるライブラリをダウンロードします。

GitHub - firebase/php-jwt: PHP package for JWT
PHP package for JWT. Contribute to firebase/php-jwt development by creating an account on GitHub.

にアクセスをします。


↑「Download ZIP」を選びます。

ダウンロードしたzipファイルの「src」の中身を稼働させるプログラムのフォルダにコピーします。

phpプログラム上から

Plain text
Copy to clipboard
Open code in new window
EnlighterJS 3 Syntax Highlighter
require_once 'jwt/src/BeforeValidException.php';
require_once 'jwt/src/ExpiredException.php';
require_once 'jwt/src/SignatureInvalidException.php';
require_once 'jwt/src/JWT.php';
use \Firebase\JWT\JWT;
require_once 'jwt/src/BeforeValidException.php'; require_once 'jwt/src/ExpiredException.php'; require_once 'jwt/src/SignatureInvalidException.php'; require_once 'jwt/src/JWT.php'; use \Firebase\JWT\JWT;
require_once 'jwt/src/BeforeValidException.php';
require_once 'jwt/src/ExpiredException.php';
require_once 'jwt/src/SignatureInvalidException.php';
require_once 'jwt/src/JWT.php';

use \Firebase\JWT\JWT;

というように記述します。

Server List(ID登録タイプ)-サンプルプログラム

Plain text
Copy to clipboard
Open code in new window
EnlighterJS 3 Syntax Highlighter
<?php
require_once 'jwt/src/BeforeValidException.php';
require_once 'jwt/src/ExpiredException.php';
require_once 'jwt/src/SignatureInvalidException.php';
require_once 'jwt/src/JWT.php';
use \Firebase\JWT\JWT;
require_once '/home/white_set/web/line/vendor/autoload.php';
use GuzzleHttp\Client;
$api_id = '(Developer Console、一番上の API ID)';
$key = "-----BEGIN PRIVATE KEY-----
(Server List(ID登録タイプ)から、ダウンロードした、認証キー。
 30行近くの改行コード付き英数字が入ります。)
-----END PRIVATE KEY-----";
function get_jwt(){
global $key;
$t_st = time();
$t_end = time() + 1800; // 認証時間を30分とします。
$payload = array(
"iss" => "(Server List(ID登録タイプ)のID。英数字。1行。)",
"iat" => time(),
"exp" => time() + 1800
);
$jwt = JWT::encode($payload, $key,'RS256');
return $jwt;
}
function getAccessToken($jwttoken){
global $api_id;
$url = "https://auth.worksmobile.com/b/".$api_id."/server/token";
$options = [
'form_params' => [
"grant_type" => urlencode("urn:ietf:params:oauth:grant-type:jwt-bearer"),
"assertion" => $jwttoken
],
'headers' => [
'Content-Type' => 'application/x-www-form-urlencoded; charset=UTF-8'
]
];
$client = new Client();
$response = $client->request("POST", $url, $options);
$status = (string) $response->getStatusCode();
$body = $response->getBody();
$json = json_decode($body, true);
return $json["access_token"];
}
function send_mes($token_now){
$message = "(送信したいメッセージ)";
global $api_id;
$botno = '(Bot No。数字)';
$consumerKey = '(Server API Consumer Keyの「key」)';
#$accountid = '(Line Works のアカウントID。xxx@xxx形式)';
$roomid = '(RoomID)';
$url = "https://apis.worksmobile.com/r/$api_id/message/v1/bot/$botno/message/push";
$options = [
'json' => [
#""accountId" => $accountid,
"roomId" => $roomid,
"content" => [
"type" => "text",
"text" => $message
]
],
'headers' => [
'Content-Type' => 'application/json;charset=UTF-8',
'consumerKey' => $consumerKey,
'Authorization' => "Bearer $token_now"
]
];
$client = new Client();
$response = $client->request("POST", $url, $options);
}
$jwt = get_jwt();
$token_now = getAccessToken($jwt);
send_mes($token_now);
exit;
?>
<?php require_once 'jwt/src/BeforeValidException.php'; require_once 'jwt/src/ExpiredException.php'; require_once 'jwt/src/SignatureInvalidException.php'; require_once 'jwt/src/JWT.php'; use \Firebase\JWT\JWT; require_once '/home/white_set/web/line/vendor/autoload.php'; use GuzzleHttp\Client; $api_id = '(Developer Console、一番上の API ID)'; $key = "-----BEGIN PRIVATE KEY----- (Server List(ID登録タイプ)から、ダウンロードした、認証キー。  30行近くの改行コード付き英数字が入ります。) -----END PRIVATE KEY-----"; function get_jwt(){ global $key; $t_st = time(); $t_end = time() + 1800; // 認証時間を30分とします。 $payload = array( "iss" => "(Server List(ID登録タイプ)のID。英数字。1行。)", "iat" => time(), "exp" => time() + 1800 ); $jwt = JWT::encode($payload, $key,'RS256'); return $jwt; } function getAccessToken($jwttoken){ global $api_id; $url = "https://auth.worksmobile.com/b/".$api_id."/server/token"; $options = [ 'form_params' => [ "grant_type" => urlencode("urn:ietf:params:oauth:grant-type:jwt-bearer"), "assertion" => $jwttoken ], 'headers' => [ 'Content-Type' => 'application/x-www-form-urlencoded; charset=UTF-8' ] ]; $client = new Client(); $response = $client->request("POST", $url, $options); $status = (string) $response->getStatusCode(); $body = $response->getBody(); $json = json_decode($body, true); return $json["access_token"]; } function send_mes($token_now){ $message = "(送信したいメッセージ)"; global $api_id; $botno = '(Bot No。数字)'; $consumerKey = '(Server API Consumer Keyの「key」)'; #$accountid = '(Line Works のアカウントID。xxx@xxx形式)'; $roomid = '(RoomID)'; $url = "https://apis.worksmobile.com/r/$api_id/message/v1/bot/$botno/message/push"; $options = [ 'json' => [ #""accountId" => $accountid, "roomId" => $roomid, "content" => [ "type" => "text", "text" => $message ] ], 'headers' => [ 'Content-Type' => 'application/json;charset=UTF-8', 'consumerKey' => $consumerKey, 'Authorization' => "Bearer $token_now" ] ]; $client = new Client(); $response = $client->request("POST", $url, $options); } $jwt = get_jwt(); $token_now = getAccessToken($jwt); send_mes($token_now); exit; ?>
<?php
    require_once 'jwt/src/BeforeValidException.php';
    require_once 'jwt/src/ExpiredException.php';
    require_once 'jwt/src/SignatureInvalidException.php';
    require_once 'jwt/src/JWT.php';

    use \Firebase\JWT\JWT;

    require_once '/home/white_set/web/line/vendor/autoload.php';
    use GuzzleHttp\Client;

    $api_id = '(Developer Console、一番上の API ID)';

    $key = "-----BEGIN PRIVATE KEY-----
    (Server List(ID登録タイプ)から、ダウンロードした、認証キー。
     30行近くの改行コード付き英数字が入ります。)
    -----END PRIVATE KEY-----";

    function get_jwt(){

            global $key;

            $t_st = time();
            $t_end = time() + 1800; // 認証時間を30分とします。

            $payload = array(
                "iss" => "(Server List(ID登録タイプ)のID。英数字。1行。)",
                "iat" => time(),
                "exp" => time() + 1800
            );
            $jwt = JWT::encode($payload, $key,'RS256');

            return $jwt;

    }

    function getAccessToken($jwttoken){
        global $api_id;

        $url = "https://auth.worksmobile.com/b/".$api_id."/server/token";
        $options = [
        'form_params' => [
            "grant_type" => urlencode("urn:ietf:params:oauth:grant-type:jwt-bearer"),
            "assertion" => $jwttoken
        ],
        'headers' => [
            'Content-Type' => 'application/x-www-form-urlencoded; charset=UTF-8'
        ]
        ];
        $client = new Client();
        $response = $client->request("POST", $url, $options);
        $status = (string) $response->getStatusCode();
        $body = $response->getBody();
        $json = json_decode($body, true);

        return $json["access_token"];
    }

    function send_mes($token_now){
        
        $message = "(送信したいメッセージ)";

        global $api_id;

        $botno = '(Bot No。数字)';
        $consumerKey = '(Server API Consumer Keyの「key」)';
        #$accountid = '(Line Works のアカウントID。xxx@xxx形式)';
        $roomid = '(RoomID)';
        $url = "https://apis.worksmobile.com/r/$api_id/message/v1/bot/$botno/message/push";
        $options = [
            'json' => [
                #""accountId" => $accountid,
                "roomId" => $roomid,
                "content" => [
                    "type" => "text",
                    "text" => $message
                ]
            ],
            'headers' => [
                'Content-Type' => 'application/json;charset=UTF-8',
                'consumerKey' => $consumerKey,
                'Authorization' => "Bearer $token_now"
            ]
        ];
        $client = new Client();
        $response = $client->request("POST", $url, $options);
    }


    $jwt = get_jwt();

    $token_now = getAccessToken($jwt);

    send_mes($token_now);


    exit;


?>

上記のプログラムで、phpプログラムから、メッセージを送信することができます。

「広告」

ワードプレスのContactform7から送信

本題の「ワードプレス」の「Contact form7」からの送信です。

Plain text
Copy to clipboard
Open code in new window
EnlighterJS 3 Syntax Highlighter
function get_form_mes(){
$submission = WPCF7_Submission::get_instance();
if($submission) {
$fm7 = $submission->get_posted_data();
$mes = "氏名\n" . $fm7['your-name'] . "\n\n";
$mes .= "メールアドレス\n" . $fm7['your-email'] . "\n\n";
$mes .= "題名\n" . $fm7['your-subject'] . "\n\n";
$mes .= "メッセージ本文\n" . $fm7['your-message'] . "\n\n";
}
return $mes;
}
function get_form_mes(){ $submission = WPCF7_Submission::get_instance(); if($submission) { $fm7 = $submission->get_posted_data(); $mes = "氏名\n" . $fm7['your-name'] . "\n\n"; $mes .= "メールアドレス\n" . $fm7['your-email'] . "\n\n"; $mes .= "題名\n" . $fm7['your-subject'] . "\n\n"; $mes .= "メッセージ本文\n" . $fm7['your-message'] . "\n\n"; } return $mes; }
function get_form_mes(){
        $submission = WPCF7_Submission::get_instance();

        if($submission) {
                $fm7 = $submission->get_posted_data();
                $mes = "氏名\n" . $fm7['your-name'] . "\n\n";
                $mes .= "メールアドレス\n" . $fm7['your-email'] . "\n\n";
                $mes .= "題名\n" . $fm7['your-subject'] . "\n\n";
                $mes .= "メッセージ本文\n" . $fm7['your-message'] . "\n\n";
        }
        return $mes;
}

先ほどの、phpプログラムファイルに上記の関数を入れます。

Plain text
Copy to clipboard
Open code in new window
EnlighterJS 3 Syntax Highlighter
function send_mes($token_now){
$message = "(送信したいメッセージ)";
function send_mes($token_now){ $message = "(送信したいメッセージ)";
function send_mes($token_now){
    
    $message = "(送信したいメッセージ)";

↑最初のプログラム、上記部分を

Plain text
Copy to clipboard
Open code in new window
EnlighterJS 3 Syntax Highlighter
function send_mes($token_now){
$message = get_form_mes();
function send_mes($token_now){ $message = get_form_mes();
function send_mes($token_now){
    
    $message = get_form_mes();

↑と変更をします。

ワードプレスの「function.php」に

Plain text
Copy to clipboard
Open code in new window
EnlighterJS 3 Syntax Highlighter
require get_template_directory() . '/line/line-wp.php';
add_action('wpcf7_mail_sent', 'send_mes', 10, 1);
require get_template_directory() . '/line/line-wp.php'; add_action('wpcf7_mail_sent', 'send_mes', 10, 1);
require get_template_directory() . '/line/line-wp.php';

add_action('wpcf7_mail_sent', 'send_mes', 10, 1);

↑と、追記します。

「line-wp.php」
が、一連のプログラムが格納されているファイルです。
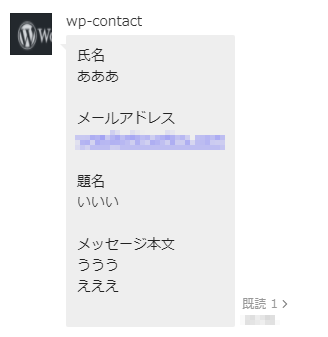

↑これで、問い合わせがあれば、メッセージが、ラインワークスのトークルームに送信されます。

タイトルとURLをコピーしました